Cross-Compiling gdbserver for a MIPS Router with Buildroot

When you’re reverse engineering an embedded device, sooner or later you want to attach a debugger to something running live on the hardware. The problem: your laptop is x86-64, the router is MIPS, and there’s no shared library environment on the router for a foreign-built debugger to lean on. You need a static gdbserver binary built for the router’s exact CPU.
This post walks through how I did that for a Realtek RTL9607C-based router (MIPS32r2 big-endian, interAptiv core, kernel 4.4.140) — building a cross-compiler with Buildroot, using it to build gdbserver from GDB 13.2 source, getting the binary onto the router over TFTP, and connecting to it with gdb-multiarch from my machine.
I ran this inside a Multipass VM, mainly so I could throw it away and redo it cleanly while writing this post — but there’s nothing VM-specific about any of it. The exact same steps work directly on a regular Linux PC; just skip the VM setup in Section 1 and run everything from your own shell.
I’ll cover the issues I hit along the way (a couple of dead ends with prebuilt binaries, a build that failed) in a companion page. This one is just the clean, working path.
1. Build environment
I built this inside a Multipass Ubuntu 24.04 VM, mostly for a disposable, repeatable environment.
What is Multipass
Multipass is Canonical’s tool for spinning up Ubuntu VMs with a single command. It uses the platform’s native hypervisor — KVM on Linux, Hyper-V on Windows, Apple Hypervisor on macOS — so the VMs are fast and lightweight, with no VirtualBox-style overhead. The key selling point for a task like this is disposability: you can create a fresh VM, do all your work inside it, and delete it completely when you’re done, with no residue left on your host machine.
Installing Multipass
On Linux:
1
sudo snap install multipass
On macOS:
1
brew install --cask multipass
On Windows, download the installer from multipass.run.
Basic usage
1
2
3
4
5
6
7
8
9
10
11
12
13
14
15
16
17
18
19
# Launch a VM (name, disk, memory, and CPU count are all optional flags)
multipass launch 24.04 --name my-vm --disk 20G --memory 2G --cpus 2

# Open a shell inside the VM
multipass shell my-vm

# Run a single command in the VM without opening a shell
multipass exec my-vm -- uname -a

# Copy a file out of the VM to your current directory
multipass transfer my-vm:/path/to/file ./file

# List all VMs and their state
multipass list

# Stop and delete a VM when you're done
multipass stop my-vm
multipass delete my-vm
multipass purge          # permanently removes deleted VMs
Launching the build VM
For this build, give the VM real resources — Buildroot pulls down a lot of source and compiles a full GCC toolchain, so disk space and CPU count matter:
1
2
multipass launch 24.04 --name busy-bedbug --disk 30G --memory 4G --cpus 4
multipass shell busy-bedbug
I’d recommend at least 20GB disk and a few cores; the VM above gave me comfortable headroom and finished in well under an hour.
If you’d rather build directly on your own PC, that works too — just install the dependencies below on your regular system and run every command from here on as-is.
Install build dependencies:
1
2
sudo apt update
sudo apt install -y git build-essential libncurses-dev wget unzip
2. Build the MIPS cross-compiler with Buildroot
I tried a couple of other routes first — prebuilt static gdbserver binaries, and the distro’s packaged gcc-mips-linux-gnu cross compiler — and both fell short for reasons I’ll get into in the issues post. Buildroot was the one that got me a clean toolchain.
Buildroot is normally used to build entire embedded Linux root filesystems, but here I’m only using it for one thing: producing a correctly-targeted cross-compiler. I explicitly skip the GDB package it can optionally build, and build gdbserver by hand from source instead (Section 3).
1
2
3
4
cd ~
git clone https://git.buildroot.net/buildroot --depth=1
cd buildroot
make menuconfig
Configure:
| Menu | Setting |
|---|---|
| Target Architecture | MIPS (big endian) |
| Target Architecture Variant | interAptiv |
| Toolchain → Kernel Headers | 5.10.x (or lowest available — doesn’t need to match the router’s running kernel exactly) |
| Toolchain → Enable C++ support | yes |
| Toolchain → Build cross gdb for the host | no |
| Target packages → Debugging → gdbserver | unchecked (we build gdbserver manually) |
Save and exit, then build:
1
make toolchain
Takes roughly 30–45 minutes on 4 cores. Verify when done:
1
2
~/buildroot/output/host/bin/mips-buildroot-linux-gnu-gcc --version
~/buildroot/output/host/bin/mips-buildroot-linux-gnu-gcc -dumpmachine
Expected:
1
2
mips-buildroot-linux-gnu-gcc.br_real (Buildroot ...) 15.2.0
mips-buildroot-linux-gnu
3. Build gdbserver from GDB 13.2 source
With the cross-compiler in hand, the next step is building just the gdbserver piece of GDB — not the full GDB client, since that runs fine on my own machine via the distro’s gdb-multiarch package (more on that in Section 5).
1
2
3
4
5
6
7
8
9
10
11
12
13
14
15
16
17
18
19
20
21
22
cd ~
wget https://ftp.gnu.org/gnu/gdb/gdb-13.2.tar.xz
tar xf gdb-13.2.tar.xz
cd gdb-13.2

mkdir build-gdbserver
cd build-gdbserver

../configure \
  --host=mips-buildroot-linux-gnu \
  --target=mips-buildroot-linux-gnu \
  --disable-gdb \
  --enable-gdbserver \
  CC=$HOME/buildroot/output/host/bin/mips-buildroot-linux-gnu-gcc \
  CXX=$HOME/buildroot/output/host/bin/mips-buildroot-linux-gnu-g++ \
  AR=$HOME/buildroot/output/host/bin/mips-buildroot-linux-gnu-ar \
  RANLIB=$HOME/buildroot/output/host/bin/mips-buildroot-linux-gnu-ranlib \
  CFLAGS="-static -mips32r2 -EB" \
  CXXFLAGS="-static -mips32r2 -EB" \
  LDFLAGS="-static"

make -j$(nproc) all-gdbserver CXX=$HOME/buildroot/output/host/bin/mips-buildroot-linux-gnu-g++
What each configure option is doing
--host=mips-buildroot-linux-gnu/--target=mips-buildroot-linux-gnu— In GDB’s build system, “host” means the machine the resulting binary will run on, and “target” means the machine it will debug. For gdbserver these are the same thing — it runs on the router and debugs a process also running on the router — so both get set to the MIPS triple. This is also what tells the configure script to treat this as a cross-build rather than a native one, since it differs from the machine actually running the build.--disable-gdb— Skips building the full GDB client. I don’t need a MIPS-hosted GDB client; the client runs on my own machine.--enable-gdbserver— The actual thing I want: just the small stub that runs on the target and speaks the GDB remote protocol back to a client.CC,CXX,AR,RANLIB— Pinned to full, explicit paths to the Buildroot cross toolchain. It’s tempting to let--host=/--target=autodetect these from the triple name, but I’d seen that go wrong before (the C++ compiler silently falling back to the host’s compiler instead of the cross one). Setting all four explicitly removes any ambiguity about which compiler touches which file.CFLAGS="-static -mips32r2 -EB"/CXXFLAGS="-static -mips32r2 -EB"—-staticavoids the need for the router to have matching shared libraries at runtime — the binary carries everything it needs.-mips32r2targets the MIPS32 Release 2 instruction set, which is what the interAptiv core implements; getting this wrong produces a binary that crashes with an illegal instruction fault the moment it tries to execute an instruction the core doesn’t support.-EBselects big-endian byte ordering, matching the router’s CPU (as opposed to-ELfor little-endian, which is more common on other MIPS devices but wrong here).LDFLAGS="-static"— Same static-linking requirement, applied at the link stage rather than the compile stage. Both are needed sinceCFLAGS/CXXFLAGSaffect compilation andLDFLAGSaffects the final linking step.
Verify the binary
1
file gdbserver/gdbserver
Expected:
1
gdbserver/gdbserver: ELF 32-bit MSB executable, MIPS, MIPS32 rel2 version 1 (GNU/Linux), statically linked, for GNU/Linux 5.10.0, with debug_info, not stripped
1
~/buildroot/output/host/bin/mips-buildroot-linux-gnu-readelf -h gdbserver/gdbserver
Confirm: Machine: MIPS R3000, Data: 2's complement, big endian, Type: EXEC, Flags: ... o32, mips32r2.
4. Copy the binary out of the VM and onto the router
4a. VM → my machine
If you built inside a Multipass VM, pull the binary out from your own terminal (not inside the VM):
1
multipass transfer busy-bedbug:/home/ubuntu/gdb-13.2/build-gdbserver/gdbserver/gdbserver ./gdbserver-mips
If you built directly on your own PC, skip this step — the binary’s already where you need it.
4b. My machine → router, via TFTP
Install and start a TFTP server on the machine connected to the router:
1
2
3
4
5
sudo apt install -y tftpd-hpa
sudo mkdir -p /srv/tftp
sudo chmod 777 /srv/tftp
sudo systemctl start tftpd-hpa
sudo systemctl enable tftpd-hpa
Place the binary in the TFTP root:
1
2
cp ./gdbserver-mips /srv/tftp/gdbserver
sudo chmod 644 /srv/tftp/gdbserver
Assign a static IP on the interface connected to the router:
1
2
3
sudo ip addr add 192.168.1.100/24 dev <your-interface>
sudo ip link set <your-interface> up
ping -c 3 192.168.1.1
On the router, fetch it into /tmp (writable tmpfs, plenty of room for a single binary):
1
2
cd /tmp
tftp 192.168.1.100
The router’s TFTP client is interactive BSD-style — at the tftp> prompt:
1
2
get gdbserver
quit
Make it executable:
1
2
chmod +x /tmp/gdbserver
/tmp/gdbserver --version
Expected: GNU gdbserver (GDB) 13.2, no crash.
5. Launch gdbserver on the router and connect with gdb-multiarch
On the router — launch mode, targeting the binary directly
1
/tmp/gdbserver 0.0.0.0:1234 /bin/cli
This starts the target process under gdbserver’s control and waits for a debugger to attach, rather than attaching to an already-running process. That distinction matters when the target is a console session rather than a background daemon — launch mode lets you set a breakpoint before the program’s logic actually runs.
On your machine — install gdb-multiarch
1
sudo apt install -y gdb-multiarch
gdb-multiarch is a build of GDB that can debug binaries for architectures other than the one it’s running on, including MIPS. This is the GDB client — it doesn’t need to be built for MIPS itself, since it just talks to the gdbserver stub over the network using the GDB remote protocol.
Set up a dedicated init file (kept separate from ~/.gdbinit)
My dotfiles repo has a .gdbinit with each option explained — fetch it directly:
1
curl -o ~/.mips-gdbinit https://raw.githubusercontent.com/acentauri92/dotfiles/master/.gdbinit
Or create one manually with the same settings:
1
2
3
4
5
6
7
8
9
10
11
12
13
14
15
16
17
18
19
20
21
22
23
24
25
cat > ~/mips-gdb.init << 'EOF'
# Intel syntax for disassembly instead of AT&T
set disassembly-flavor intel

# Disable auto-fetching debug info from the network
set debuginfod enabled off

# Target architecture for the remote session
set architecture mips

# Split-pane TUI instead of plain command-line GDB
tui enable

# Show disassembly alongside source, then add the registers pane
layout asm
layout regs

# Keep keyboard focus on the GDB prompt, not the TUI panes
focus cmd

# Shortcut: type `connect` to attach to the router's gdbserver
define connect
  target remote 192.168.1.1:1234
end
EOF
I have kept this in its own file rather than ~/.gdbinit so my regular x86 GDB setup isn’t touched by MIPS-specific settings.
Launch and connect
1
gdb-multiarch -x ~/mips-gdb.init
Then inside GDB:
1
(gdb) connect
connect is a shortcut defined above for target remote 192.168.1.1:1234 — it attaches over the network to the gdbserver instance running on the router. From here I set breakpoints and step through manually, one instruction at a time, rather than scripting the whole sequence — useful for a live demo where I want to walk through what’s happening at each step:
1
2
3
(gdb) break *0x40af0c
(gdb) continue
(gdb) si
What the TUI shows
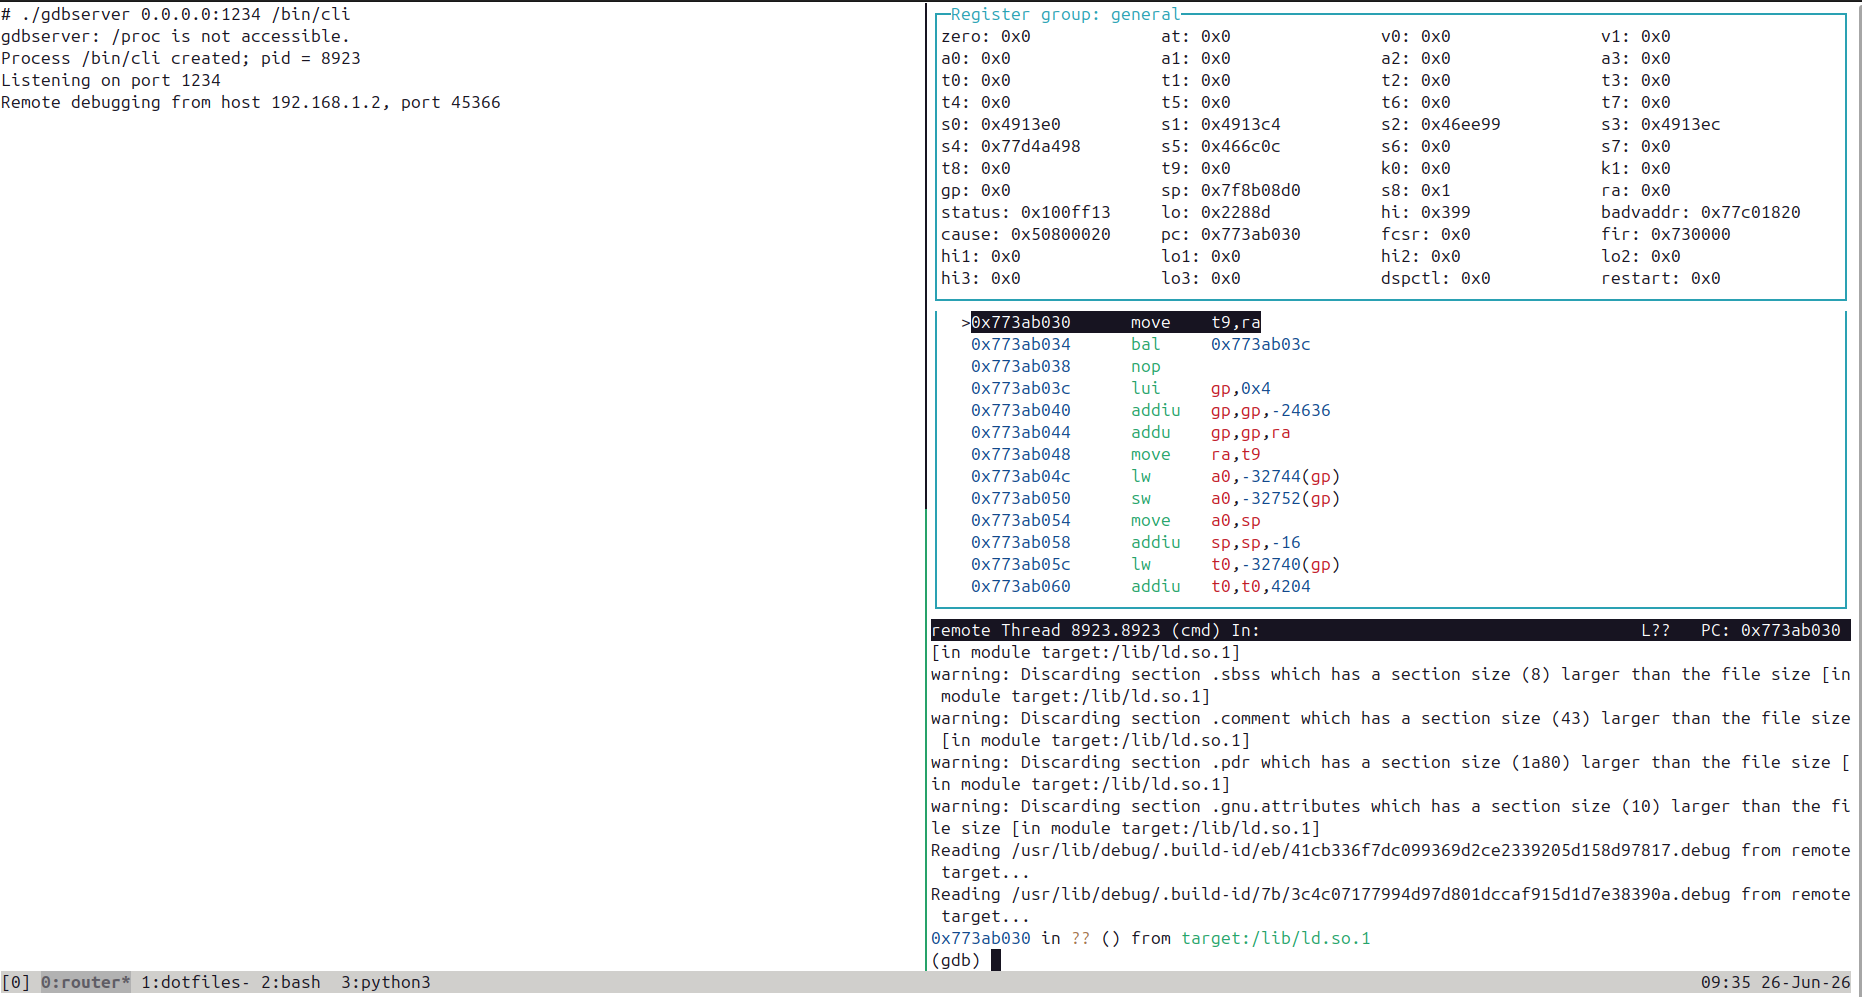 Initial connection — gdbserver on the router has accepted the remote attach, and the TUI splits into a disassembly pane (centre) and a register pane (right)
The screen divides into three areas. The top-left terminal shows gdbserver’s side: Listening on port 1234 followed by Remote debugging from host 192.168.1.2 once gdb-multiarch connected. The right pane lists every MIPS general-purpose register — a0–a3, v0–v1, t0–t9, s0–s7, gp, sp, ra, and so on — each showing its current value. The centre pane shows the disassembly around the current program counter, with the current instruction highlighted. The GDB prompt at the bottom is where commands are typed; focus cmd in the init file ensures keystrokes go there rather than scrolling the TUI panes.
Setting breakpoints by address
Because we have no debug symbols for /bin/cli, there are no function names to break on — everything has to be done by raw address. The address 0x40af18 is the entry point I wanted to stop at (identified earlier through static analysis). Setting a breakpoint by address uses the * prefix:
1
2
3
(gdb) break *0x40af0c
Breakpoint 1 at 0x40af0c
(gdb) continue
continue lets the process run until it hits the breakpoint. Once it does, GDB halts execution and the TUI updates: the highlighted line in the disassembly pane jumps to 0x40af0c, and every register that changed since the last stop is flagged in the register pane. From that point, si (step instruction) executes exactly one machine instruction and hands control back — letting you watch the CPU state evolve one step at a time.
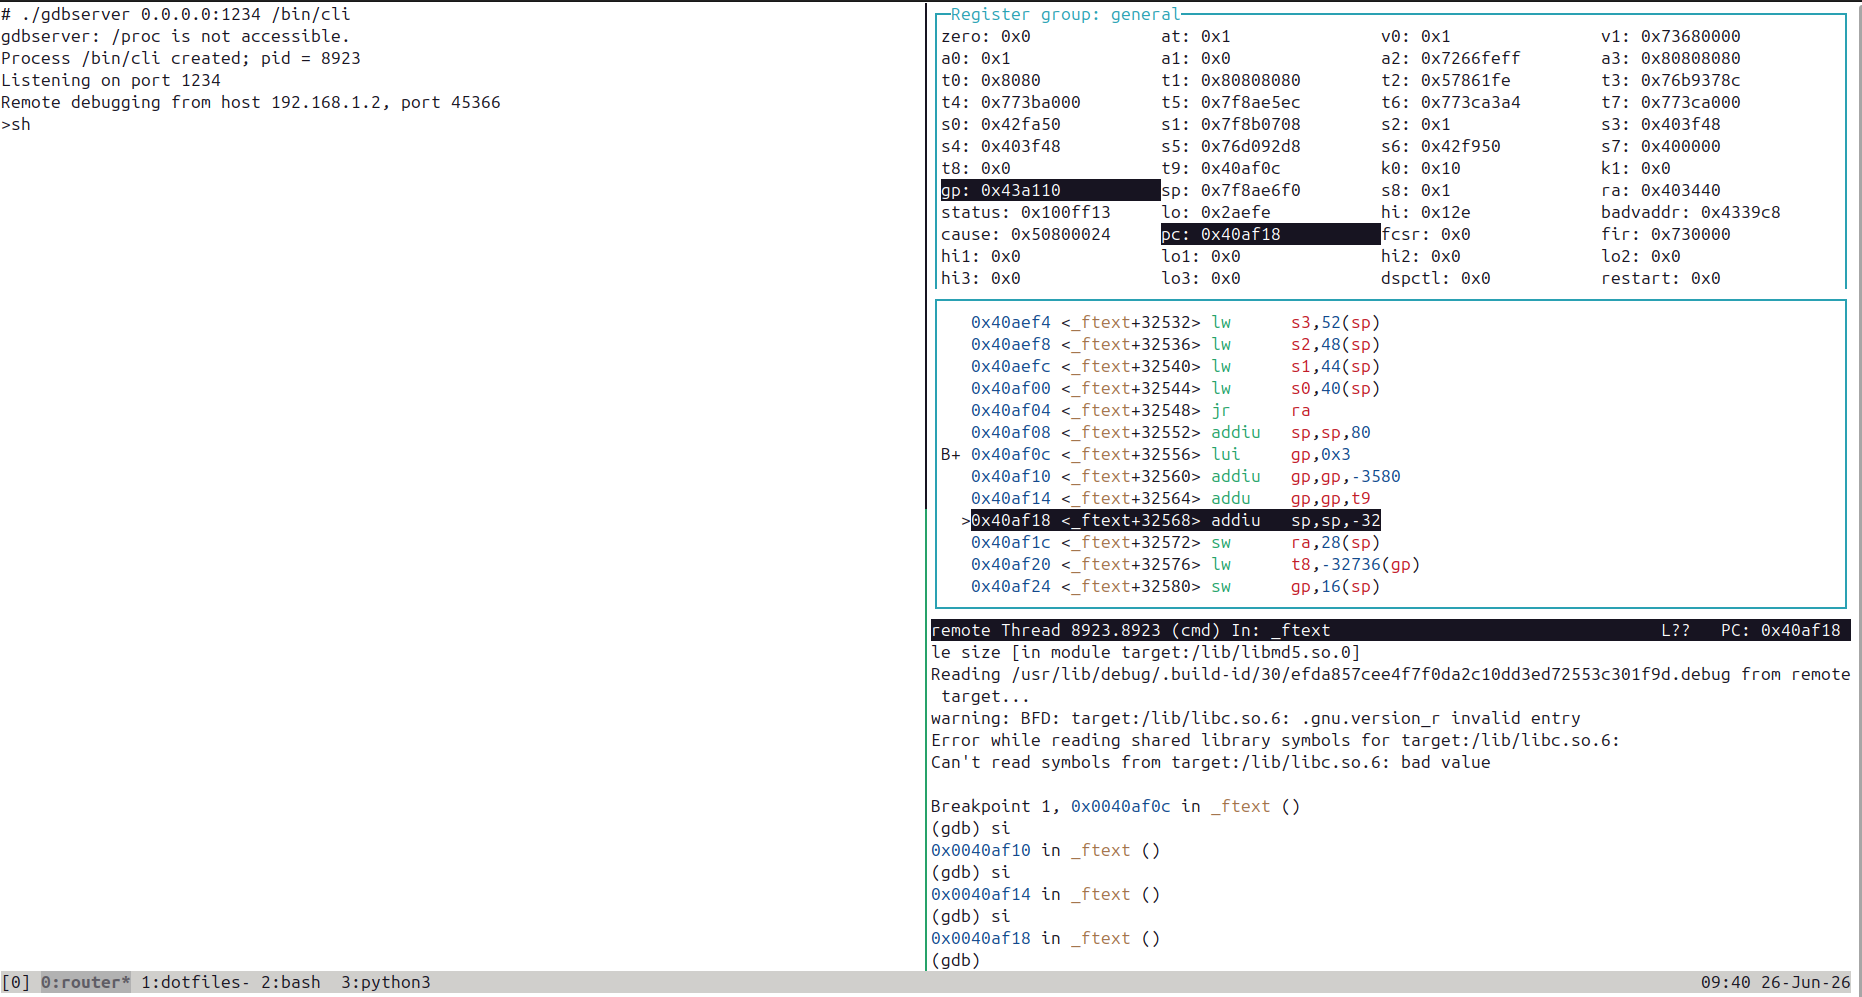
Stepping through the function prologue — watching $gp get set up
$gp (the global pointer) is a MIPS register that gives the compiler a cheap base address for accessing global and static data. Rather than encoding a full 32-bit address into every load and store, the compiler emits 16-bit offsets from $gp, which is faster and more compact. The catch is that $gp must be initialised at the start of every function — that initialisation is part of the function prologue, and it takes two or three instructions to complete.
Stepping through with si after hitting the breakpoint shows this happen live:
1
2
3
(gdb) si
(gdb) si
(gdb) si
 Each
Each si advances one instruction; the register pane highlights $gp changing as the function prologue works through the lui / addiu / addu sequence that builds the global pointer
The disassembly pane shows the prologue sequence clearly. The first instruction is a lui gp, <upper> — lui (Load Upper Immediate) shifts a 16-bit value into the upper half of $gp, giving it the coarse address of the global data area. The second is addiu gp, gp, <lower> — this adds the signed 16-bit lower half, landing $gp on the exact base address the linker chose. Together these two instructions construct a full 32-bit address in two steps, which is the standard MIPS idiom for loading a constant too large to fit in a single instruction.
After each si, the register that just changed is highlighted in the register pane. You can watch $gp go from zero, to a value with only the upper bits set (after lui), to its final value (after addiu). The rest of the prologue — addiu sp, sp, -N to carve out the stack frame, and a sequence of sw instructions to spill callee-saved registers — follows in the same way, each step visible in both the disassembly and register panes simultaneously.
This is the whole point of the setup: static analysis tells you what the code looks like on paper; single-stepping through it live on the hardware tells you what the CPU is actually doing, with real register values and real memory, on the exact firmware image the device shipped with.
Conclusion
The full chain here is longer than it looks on paper: build a cross-compiler from scratch with Buildroot, use it to compile a statically linked gdbserver from GDB source, transfer the binary to a router over TFTP, and connect to it with gdb-multiarch from your own machine. Each step exists for a concrete reason — the router has no package manager, no shared libraries, and a completely different instruction set — and there is no shortcut that skips more than one of them cleanly.
But once it is all in place, what you get is qualitatively different from anything static analysis alone can give you. You are not reading a disassembly and reasoning about what a register probably contains at a given point — you are watching the actual CPU execute the actual firmware, one instruction at a time, with every register value visible and updated in real time. The $gp calculation is a small example of that: it is a three-instruction sequence that is easy to skim over in a disassembler and easy to misread, but becomes completely unambiguous the moment you watch it execute step by step and see the value appear in the register pane.
For a device like this — a closed, vendor-firmware router with no source code and no debug symbols — that kind of ground truth is exactly what you need.