From radio waves to bits: FSK, Manchester encoding and the inside of a TPMS packet
How a tyre pressure sensor sends its data: a spectrogram of a real packet, FSK, Manchester encoding, the fields inside a packet and the Packet Lab.
In the last post we captured a raw TPMS signal and looked at it in GNU Radio. We saw the frequency jumping between two levels. In this post, we will see how data is sent over the radio using frequency shift keying (FSK), how exactly the bits in the data are encoded using something called Manchester encoding, and why we use it.
Seeing the signal: the spectrogram
A spectrogram is a visual representation of a radio signal, with time running left to right, frequency going up and down and colour showing how strong the signal is. Here is the same Toyota IQ recording from the last post, taken from the public rtl_433_tests repo.
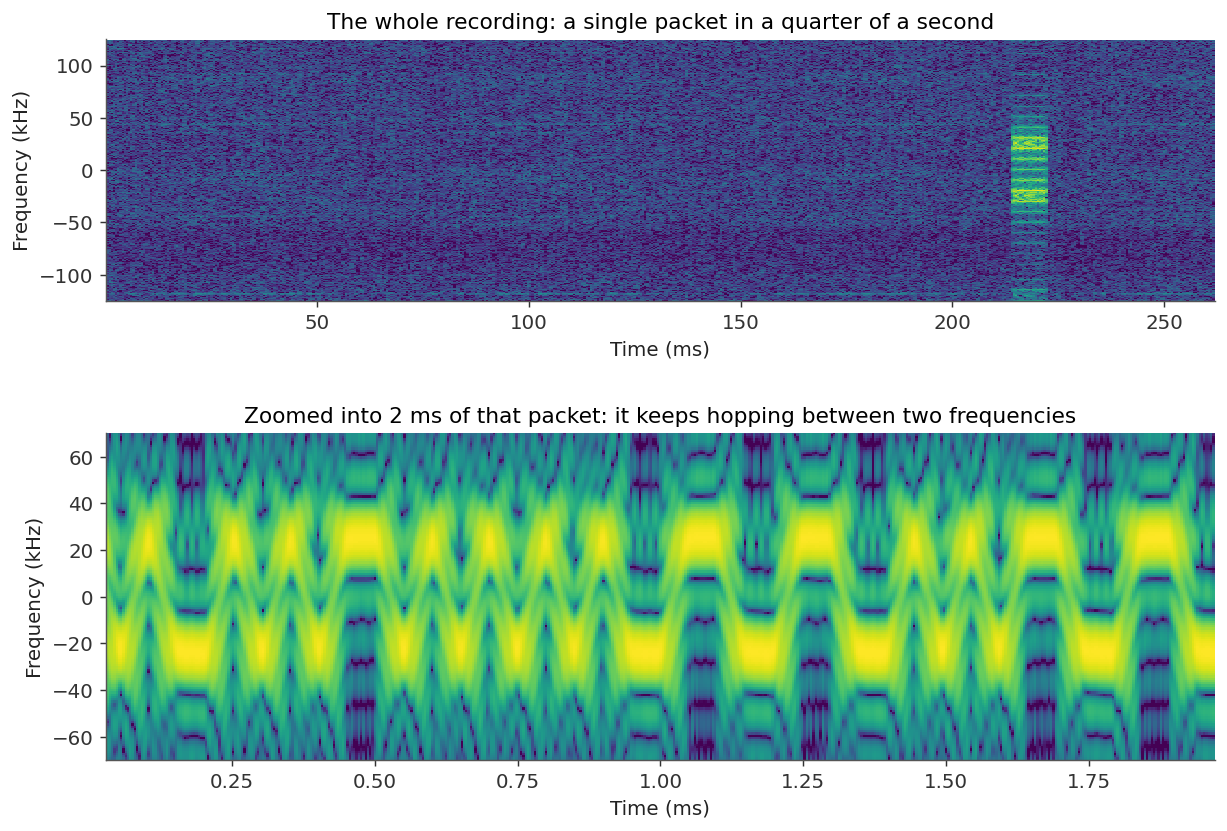 Spectrogram of a Toyota TPMS packet from the rtl_433_tests repo
The top plot is the whole recording, where the sensor stays quiet for a while and then sends a single packet at around 215 ms that lasts about 8 ms. This could have been the moment the car started moving, or the recording just happened to catch a packet at that point. Zooming into it, we can see that the signal never stays still and keeps hopping between two frequencies about 50 kHz apart. If you recall how binary works, electronics use 1s and 0s, on and off, to store and send data. The hops here work the same way, each one carrying a bit, and how they do that is what FSK is all about.
What is FSK?
To send data over the air, the sensor has to put its bits onto a radio wave, and this is called modulation. There are a few ways to do it: change how strong the wave is (amplitude shift keying, or ASK), how fast it oscillates (frequency shift keying, or FSK) or where it starts in its cycle (phase shift keying, or PSK).
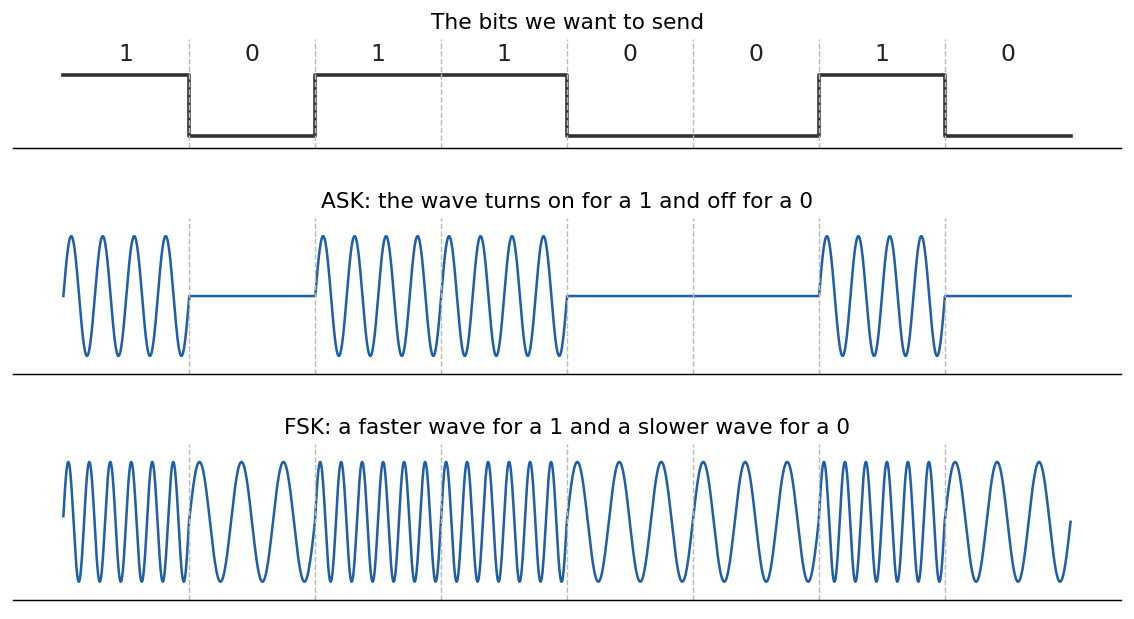 The same bits sent with ASK and with FSK
ASK is the simplest, with the wave switched on for a 1 and off for a 0. FSK keeps the wave on all the time and changes its frequency instead, using one frequency for a 1 and another for a 0. That is exactly what we saw in the spectrogram, where the Toyota sensor switches between a tone about 25 kHz above the centre and one about 25 kHz below it.
Why FSK?
So why do most TPMS sensors, including the ones in my car, use FSK and not the simpler ASK? The sensor lives inside a spinning wheel, wrapped in a metal rim and a rubber tyre, so the signal reaching the car keeps getting stronger and weaker as the wheel turns. With ASK the data is in that strength, so a weak moment can easily be mistaken for a 0. FSK only cares about which of the two frequencies is present, which makes it much better at handling these drops and the noise from everything else on 433 MHz. The radio also transmits at the same power for the whole packet, which keeps the chip simple and efficient, and that matters for a sensor running on a coin cell that has to last for years.
Manchester encoding
Sending bits as two frequencies still leaves one problem. If the sensor sends a long run of bits like 00000000 or 11111111, the signal just stays on one frequency, and the receiver has no way to tell where one bit ends and the next one begins (you can see this in the image below). So FSK on its own is not enough, and the transmitter and receiver also need some way to stay in sync. Even if they start in sync, a slight difference between their clocks can make the receiver count seven or nine bits instead of the eight that were sent.
Manchester encoding fixes this by sending every bit as a change instead of a level, where a 1 is a transition from low to high in the middle of the bit and a 0 is a transition from high to low (some systems use the opposite). The cost is that each bit now takes two symbols, which is a small price for a packet that is only a few bytes long.
So how does the receiver stay in sync using this? It already knows roughly how long a bit should be, and it uses these changes as a clock. Every time it sees the change in the middle of a bit, it lines its own timing up with it and then waits about one bit length for the next one. If its clock is running slightly fast or slow, the error gets corrected at every bit instead of building up, so it stays in sync with the sensor for the whole packet.
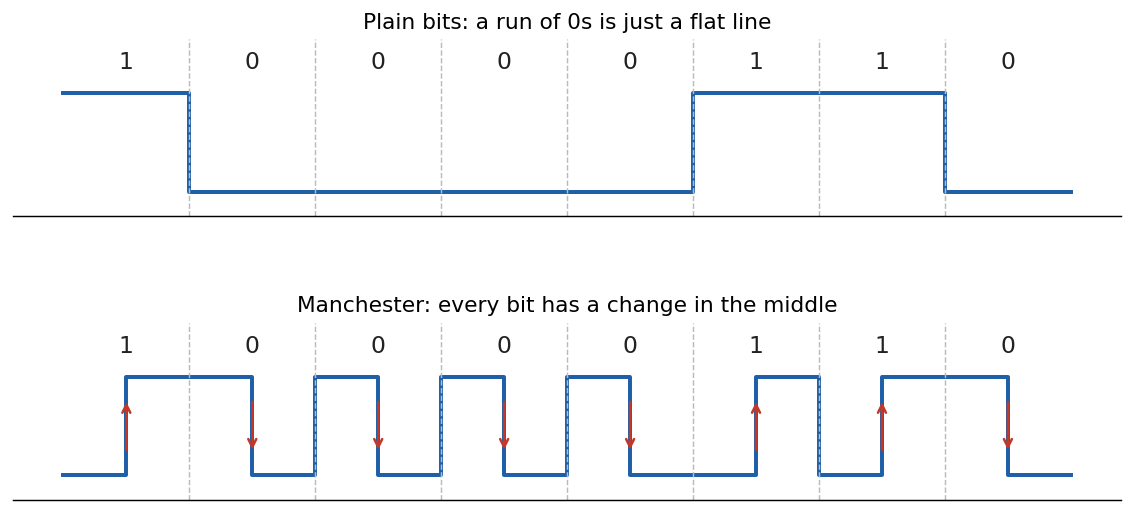 The same bits, sent plain and with Manchester encoding
This also explains the hops of two different widths in the spectrogram. When a bit is followed by a different one, the two halves in the middle land on the same frequency and merge into one longer step.
From bits to bytes: inside a packet
Once the receiver has turned the hops into bits, it is left with a short packet. Every packet starts with a fixed pattern called the preamble, which gives the receiver something to lock on to before the real data arrives. For the Toyota sensor in our recording, the data that follows is just 72 bits, or 9 bytes.
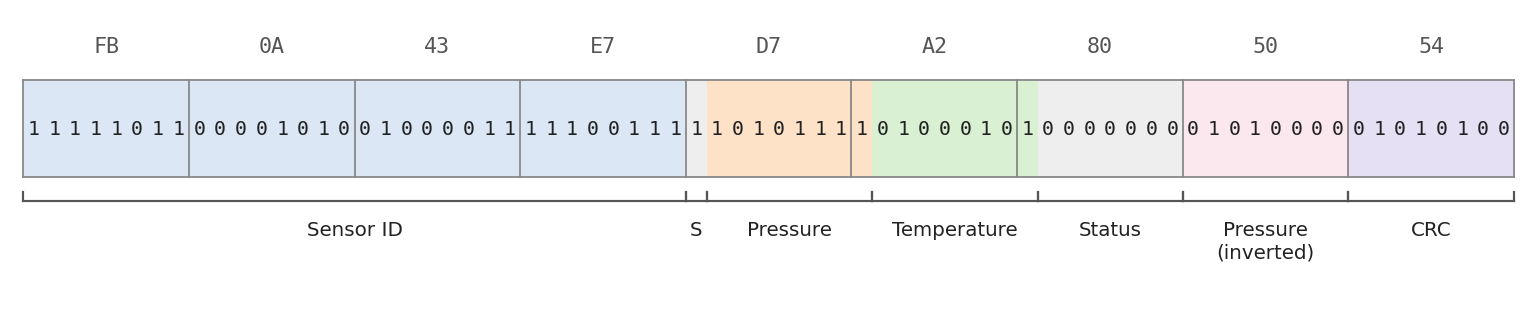 The Toyota packet from our recording, split into its fields
The first 4 bytes are the sensor ID, FB0A43E7, which is the same for every packet from this sensor and is how the car tells its four tyres apart. Next come the pressure and the temperature, followed by a few status bits. The sensor then sends the pressure again with every bit flipped as a quick check, and the last byte is a CRC, a checksum the receiver uses to throw away any packet that got damaged on the way.
None of this is in a public datasheet, and the layout above comes from the rtl_433 Toyota decoder, which people in the community worked out from their own captures. Turning these bits into actual PSI and °C, and working out which bits mean what in the first place, is something I had to do for the sensors on my own car. We will go through all of it in a later post, where we analyse my car’s packets and build a decoder for them.
Packet Lab
To make all of this easier to see, I built Packet Lab, a small page that takes one recorded TPMS transmission and walks through it from the radio signal to the fields inside it. You can see the frequency hops with the decoded bits drawn on top of them, and click on any bit or field to zoom into the part of the signal it came from. It runs entirely in your browser and uses a few public recordings from the rtl_433_tests repo, so you can try it yourself at Packet Lab.
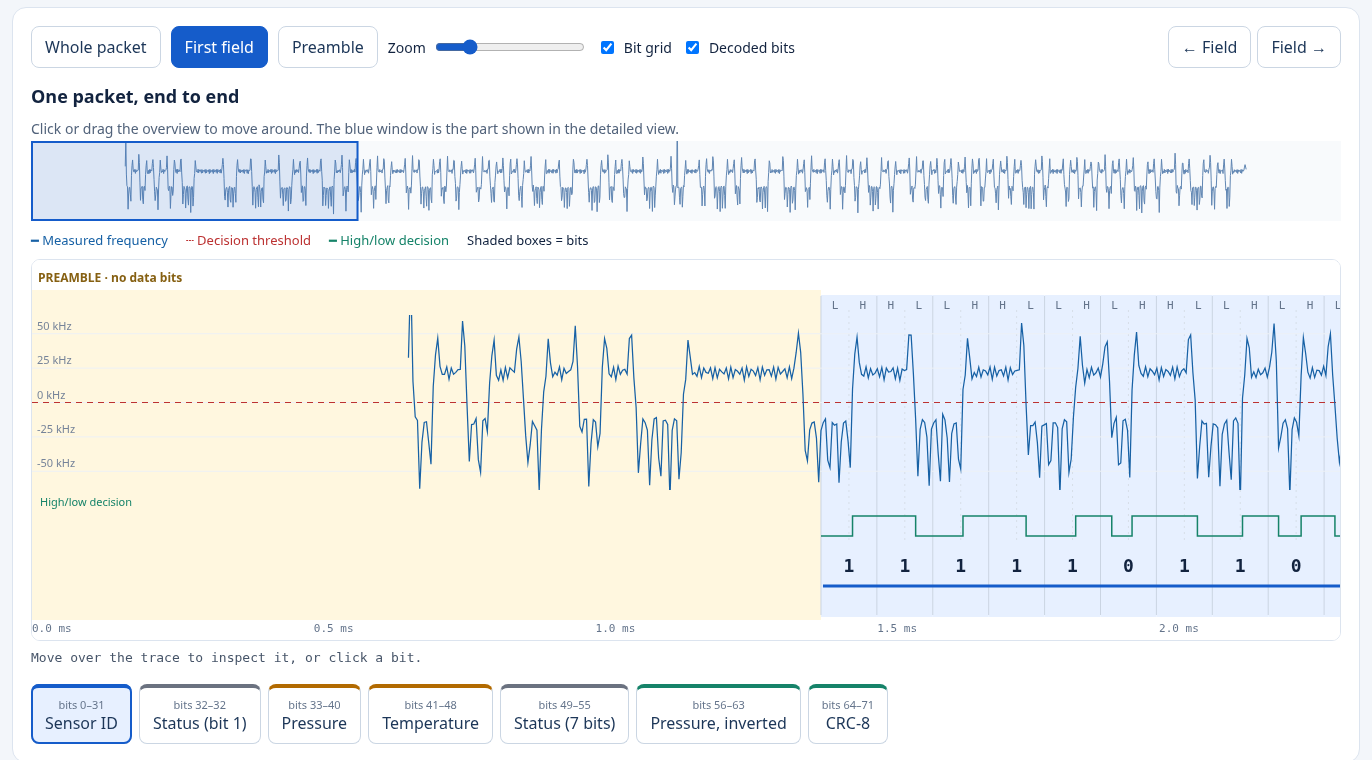 Packet Lab, showing the same Toyota packet
The packets also change with what the sensor is doing. Pick the Toyota sensor that was woken up by a workshop tool or running on a low battery, or the Subaru sensor sending a pressure-change alarm, and you will see the status bits change while the sensor ID stays the same. We will look at these modes properly in a later post, along with what happened when I let the air out of my own tyre.
Coming up
Coming up in this series:
- Decoding the packets from my own car and building a decoder for them
- The different modes of a sensor, and what happens when I let the air out of my tyre
- Building a surveillance lab in my glovebox to collect data on every drive
- Why the sensor measures temperature
- Doing all kinds of data analysis on the data collected
Stay tuned.