Reverse engineering my tyre sensors, part 2
How I found the pressure and temperature data in my car's tyre sensor packets with a digital tyre pressure gauge, a temperature sensor and a few experiments.
In the last post, using some debugging tools from the rtl_433 repository, we got the raw bits out of the FSK modulated signal from my car. Using some web based tools, we also decoded the Manchester encoded bits, eventually getting the raw bytes in the packet. Here are the same four copies from the front-right tyre again, as shown by BitBench.
1
2
3
4
86 1c d3 97 | 3d 01 56 1c | bc
86 1c d3 97 | 3d 11 56 1c | cc
86 1c d3 97 | 3d 21 56 1c | dc
86 1c d3 97 | 3d 31 56 1c | ec
These bytes don’t mean anything until we make sense of them, by working out which bits represent the pressure and the temperature.
BitBench is fine for decoding a few packets and learning, but a single drive usually gives hundreds of packets, and BitBench is not practical for that. It would mean cutting every packet out of the recording and pasting its bits into the page one by one, which is slow and time consuming. So for my experiments I needed something that decodes them all in one go. It turns out rtl_433’s flex decoder can undo the Manchester encoding itself, with the decode_mc option that was added in version 25.12. It follows the opposite convention to my sensor, so invert flips the bits first, and preamble lines the decoding up right after the preamble:
1
rtl_433 -R 0 -X 'n=my_car, m=FSK_PCM, s=52, l=52, r=150, invert, preamble={16}aaa9, decode_mc' -r recording.cu8
On my recording from the last post, this prints the same four packets as BitBench. So after every drive, I ran this on the recording, and it printed the decoded bytes of every packet my car sent.
As mentioned in the earlier posts, during the workshop visit I got a chance to see the actual sensor when the tyre was removed. From the ID printed on the sensor and the workshop’s OBD tool, we know the ID is represented by the first 4 bytes, in this case 861cd397. This matches what is printed on the sensor. As shown above, the bytes are separated by a line to show what we know. We also know the last byte is the checksum, which is used to make sure a packet is not corrupted. I showed how to calculate it, and how we know it is a checksum, in the last post.
Now, somewhere in there are the bytes representing the pressure and the temperature, since that is the whole point of the sensor. There is no datasheet for this sensor. You can try looking for one, but you won’t find any, as manufacturers usually keep this hidden. The only way to find out which byte is which, at least that is what I thought, is to change one thing about the tyre at a time, watch which bytes change, and repeat the same for the temperature. This was the theory. In this post we will go through how I actually tested the theory and the experiments I did with my tyres, a digital tyre pressure gauge and a temperature sensor. In the end, I came up with formulas that turn these raw bytes into pressure values in psi and temperatures in °C, and we will also see the one byte which made no sense to me even after the experiments, and is still a mystery.
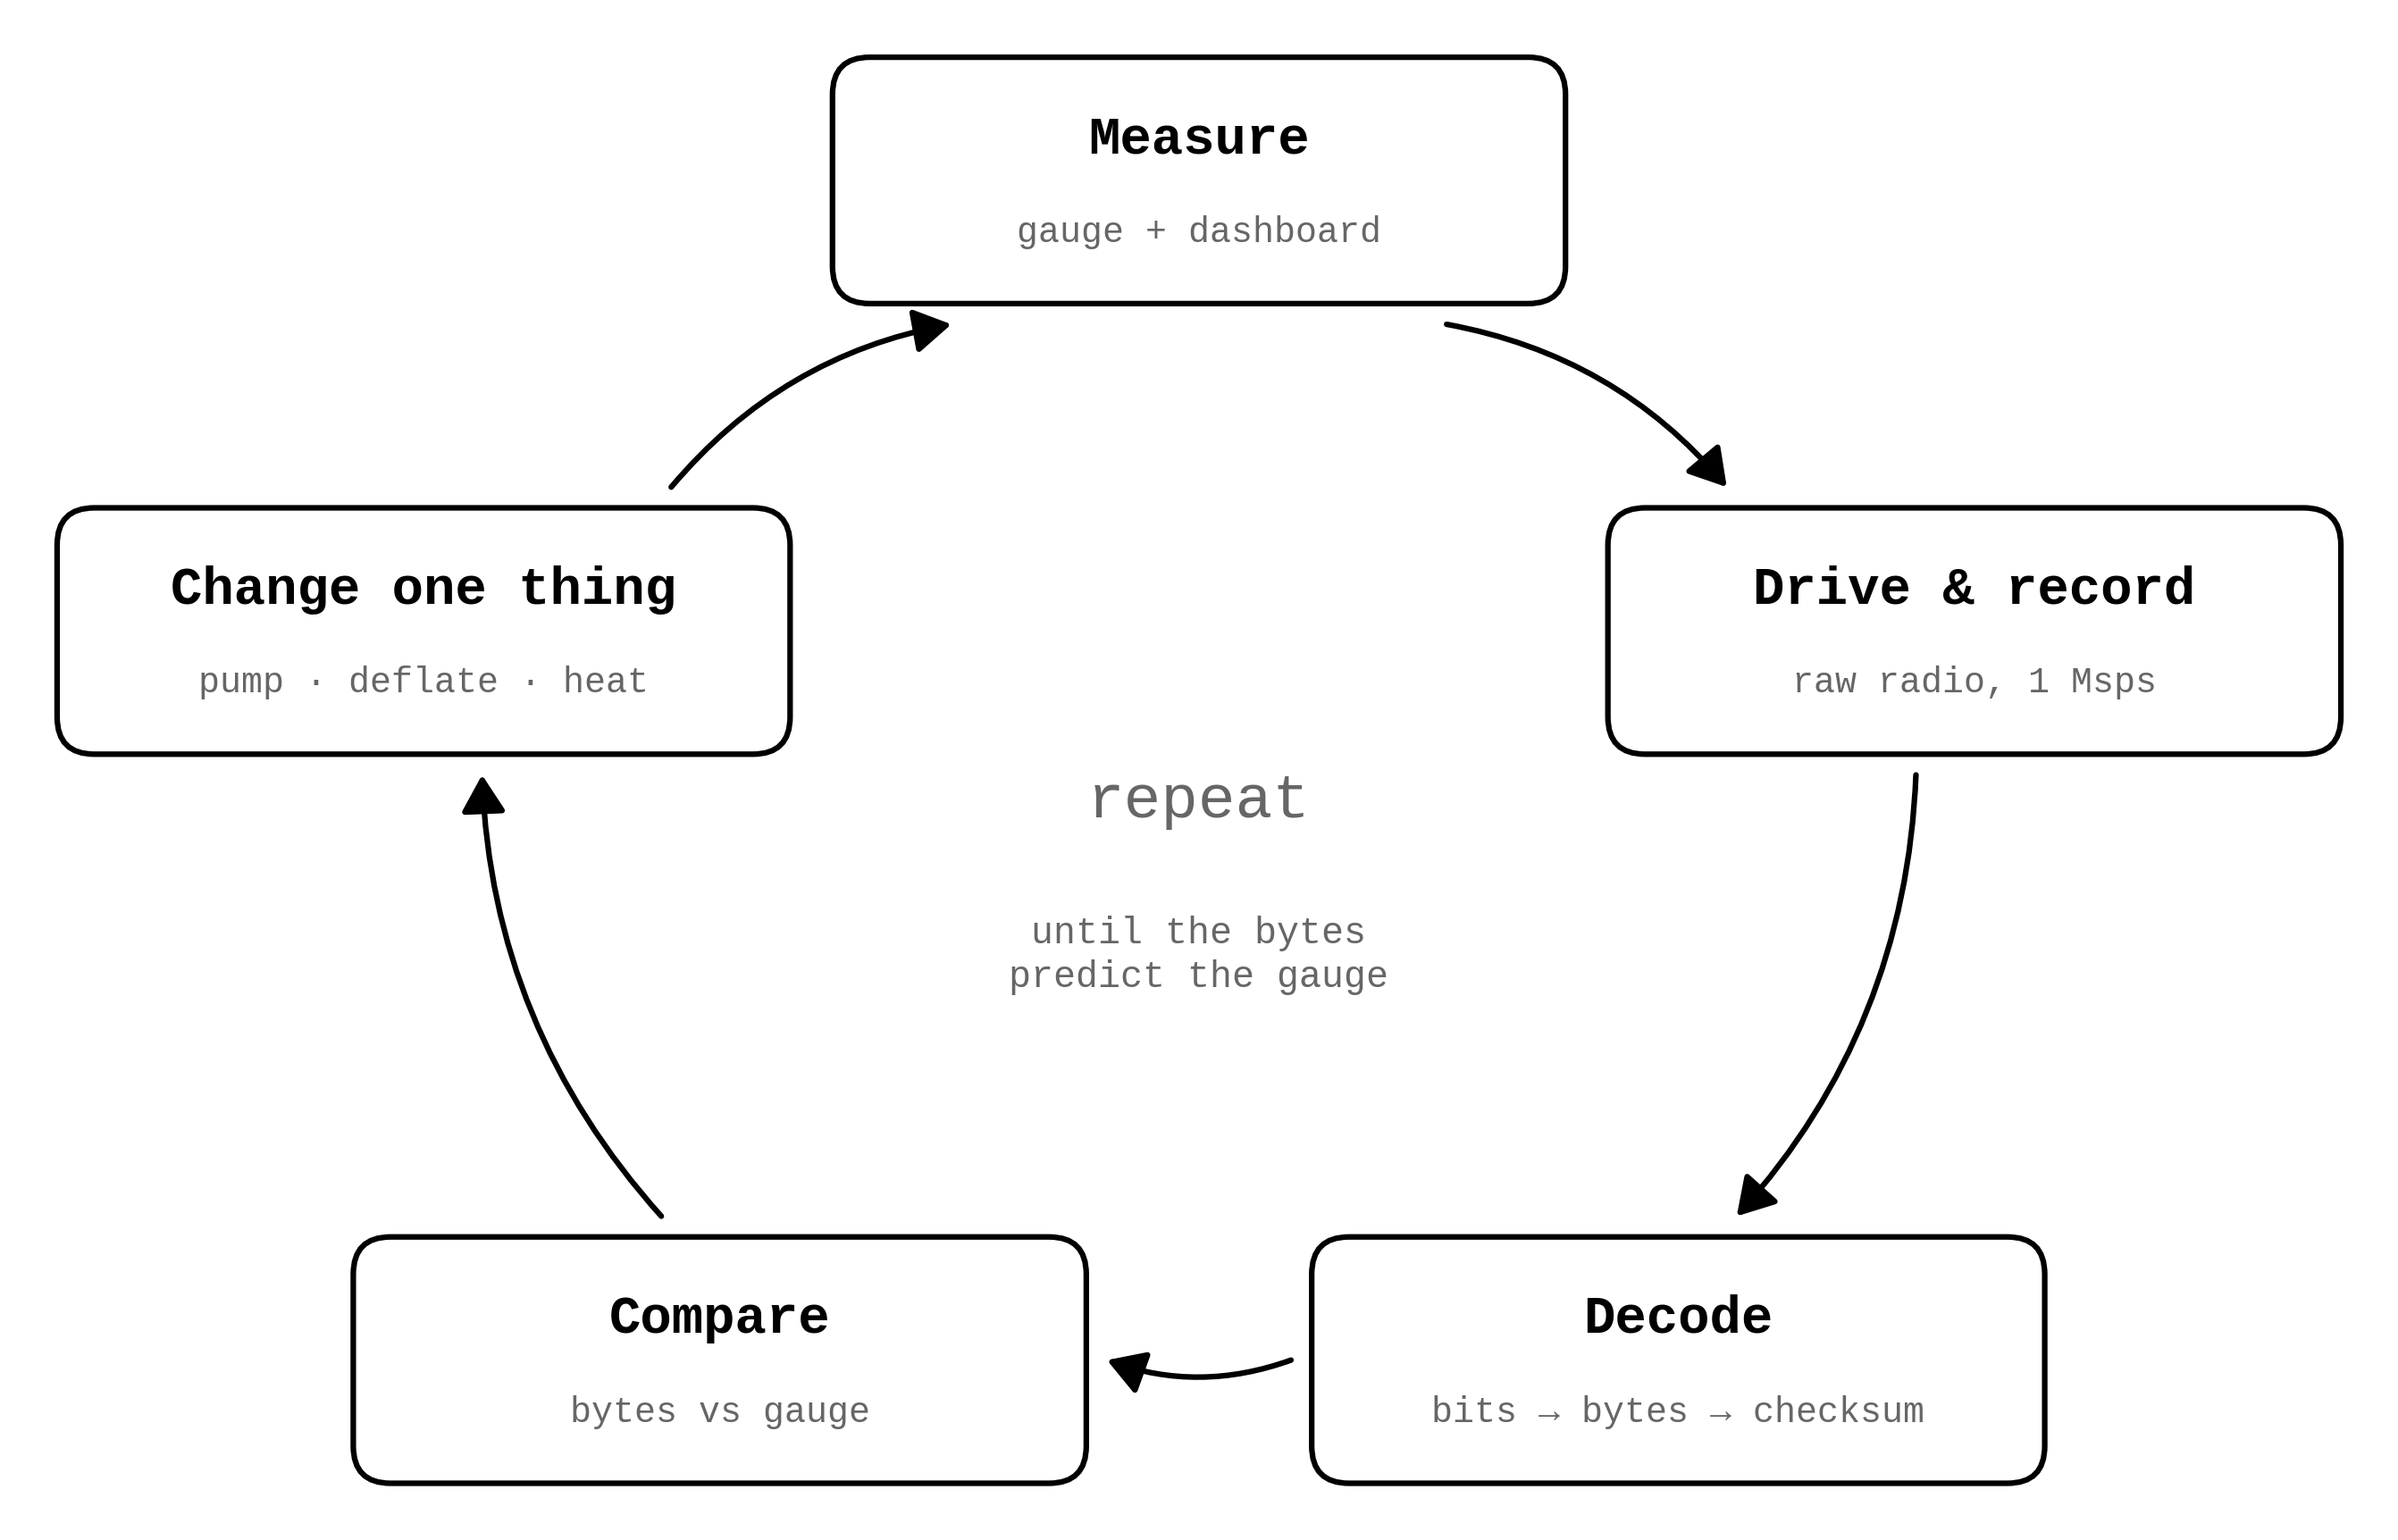 The loop I kept repeating until I could decode the bytes
The counter in the sixth byte
The easiest one to start with is the sixth byte, two bytes after the sensor ID, which we already saw changing in the last post. The sensor sends every reading four times in a row, in a burst. We know this from the IQ recordings and the spectrogram we saw in the last post, where the four packets come one after another in about half a second, and the FCC test report for this sensor shows exactly the same:
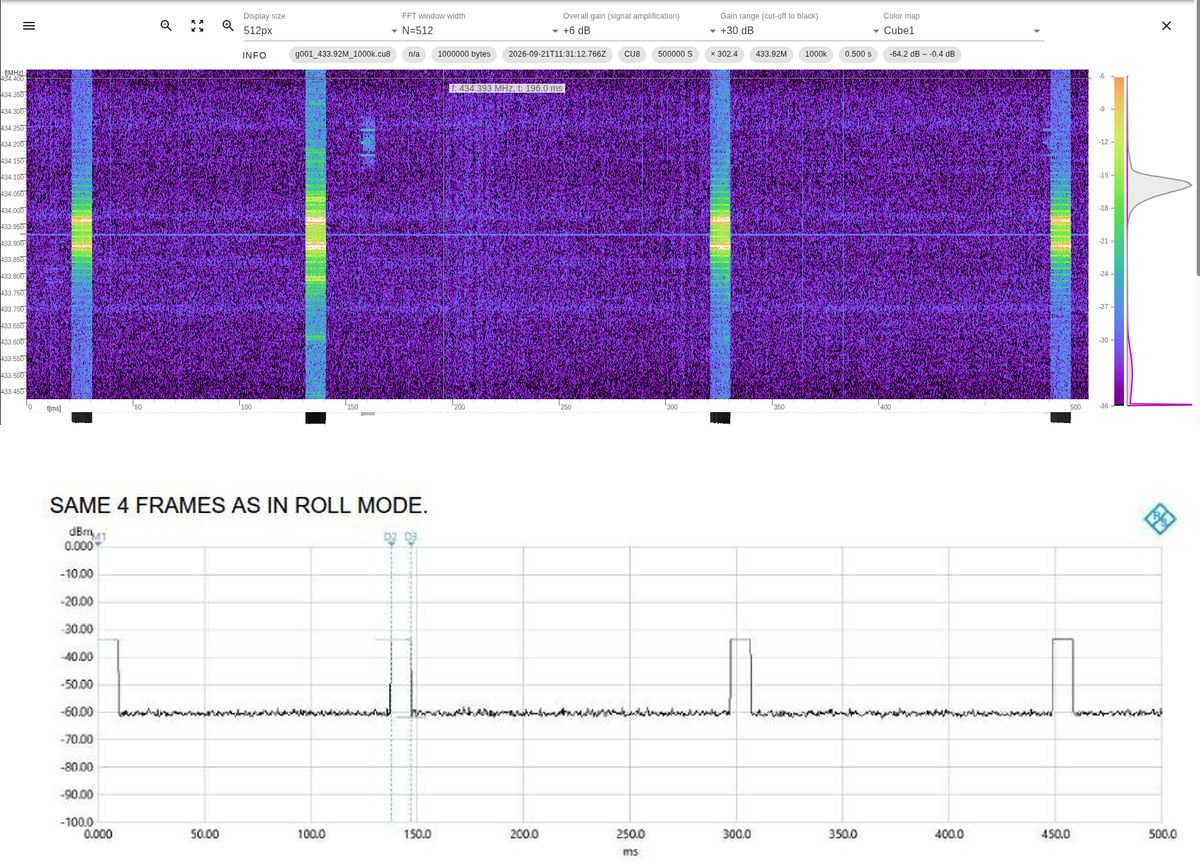 Four packets in one burst. Top: my own recording in the triq.org spectrogram tool. Bottom: the FCC test report for my sensor. Both cover half a second
This is for redundancy. Sending four copies means that at least one gets through even if the others are lost. The sixth byte is the one that counts these copies.
A byte is made of two halves of 4 bits each, called nibbles, and each hex digit is one nibble. In the diagram below, the sixth byte of each copy is also shown in binary. As you can see, the first nibble goes 0, 1, 2, 3 from one copy to the next, while the second nibble stays at 1.
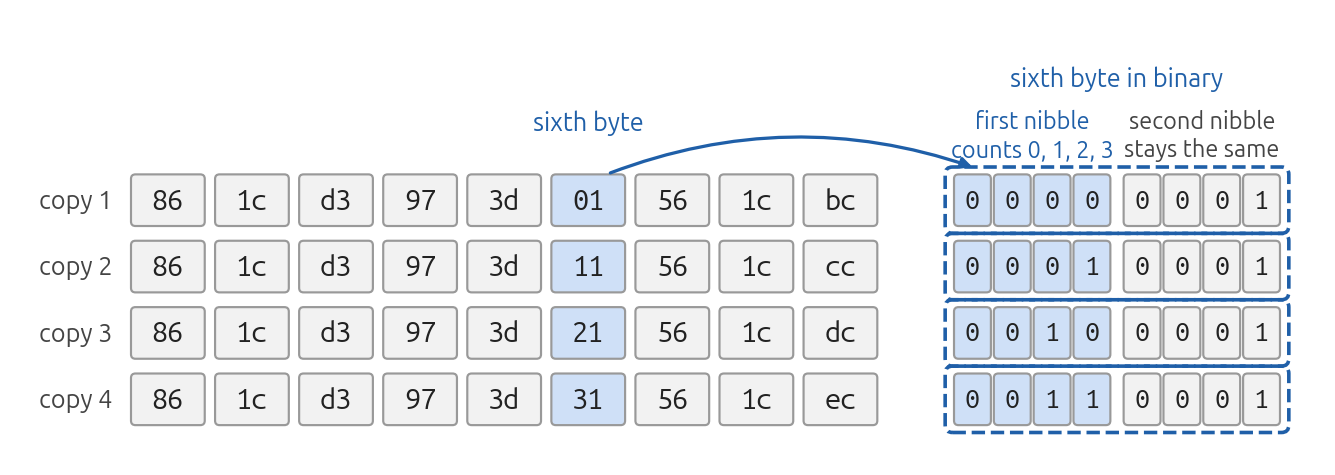 The four copies in one burst. Only the first nibble of the sixth byte changes, and the last byte is the checksum
So the first nibble is the counter, and it tells the receiver which of the four copies this is.
But what about the second nibble? A burst is not sent just once. While the car is moving, the sensor sends a new burst every few seconds to a minute, so the car always has a fresh reading. How did I know this? Just by browsing through the logged data. In this recording, the next burst from the same tyre came about 21 seconds later. Its first nibble counts 0 to 3 again, just like before, but the second nibble is now 2 instead of 1. To make this easy to see, the diagram below compares the first copy of each burst. Both have the counter at 0, so the first nibble is the same in both rows, and the only change in the sixth byte is the second nibble:
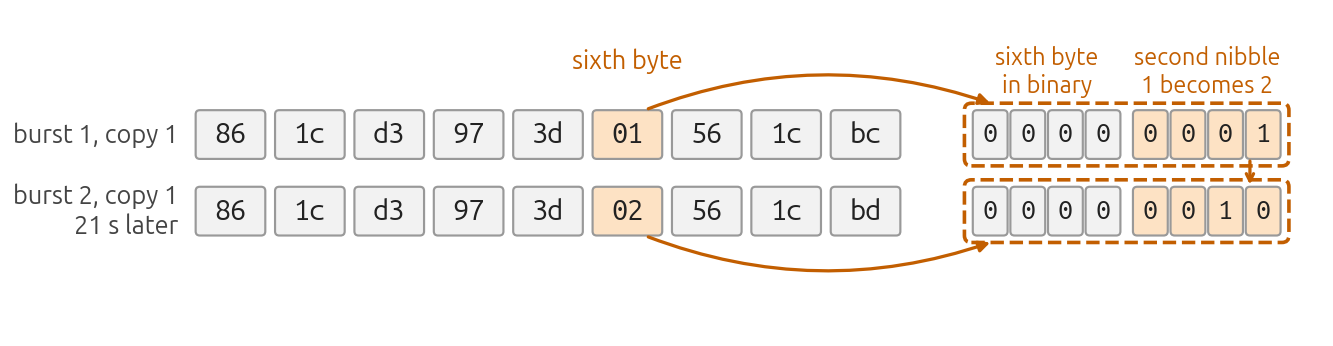 The first copy of two bursts, 21 seconds apart. Only the second nibble of the sixth byte changes
The second nibble stays the same within a burst and changes from one burst to the next, so it works like a burst number. It does not simply go up by one each time though. The next burst after this one had a 4, so I am not sure yet what it means. Maybe one of the bursts got lost for some reason. My guess is that it helps the car tell one burst apart from the next.
That leaves the very first bit of the byte. In both bursts above it is 0, so you could easily think it is part of the counter too. But a few bursts later, the same tyre sent a packet where the first bit was 1, so the sixth byte read 87. And at the same moment, the fifth byte dropped from 3d to 3c. That looks like two separate changes, but if you write the fifth byte in binary and put the first bit of the sixth byte at the end of it, they turn into one 9-bit number, and that number just went down by one, from 122 to 121:
 The fifth byte and the first bit of the sixth byte make one number, which drops by one
This was not a magical thought that popped up in my head. A field crossing from one byte into the next is quite common in these kinds of sensor packets. The Toyota packet we looked at in Part 4 does the same thing. As shown below, a single status bit right after the ID pushes everything one place to the right, so both its pressure and its temperature start in one byte and end with the first bit of the next. I took that as a reference for this.
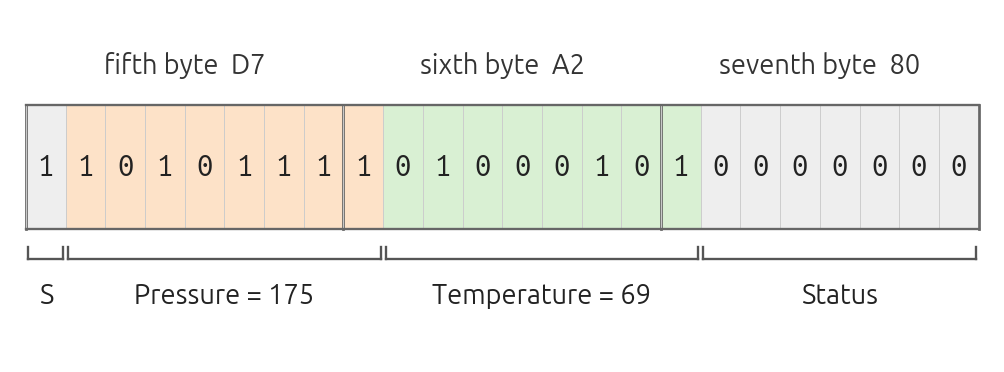 In the Toyota packet, both the pressure and the temperature cross into the next byte
So the first bit of the sixth byte is actually part of the pressure, spilling over from the fifth byte, and one step is a tiny change in pressure. We will turn this number into psi in the pressure section below. The remaining two bits of the sixth byte, the second and the fifth one, were 0 in every single packet I ever received, so I don’t know what they are for. Here is the whole sixth byte, bit by bit:
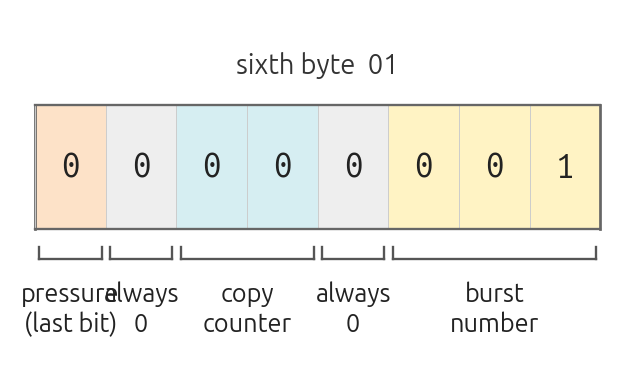 What each bit of the sixth byte does
This also explains the Abarth log from the start of the last post, and why it was showing incorrect pressure. Looking at the Abarth decoder’s source code, it reads this whole byte as the pressure and multiplies it by 1.38 to get kPa. So a 00 became 0 kPa, a 01 became 1.38 kPa, and an 81, with that first bit set, became 178.02 kPa. The “pressure” jumping around in my logs was really this counter and its neighbours.
Finding the temperature
For the temperature I suspected the seventh byte, because that is the one right after the pressure and the counter. Before we look at its values, one thing to keep in mind. The bytes in the packets are written in hexadecimal (hex), but for everything that follows we need normal decimal numbers. In a two-digit hex number, the first digit counts sixteens and the second counts ones, so the seventh byte of our front-right packet, 56, means 5 sixteens and 6 ones:
1
56 (hex) = 5 x 16 + 6 = 86 (decimal)
From here on, all the values of the seventh byte are in decimal.
On one of my early recordings, the car had been parked in a basement all day, and all three sensors started with exactly the same value, 85, in the seventh byte. As the drive went on they spread apart, with the front-right increasing the fastest, just like the plot of my tyres warming up in the last post. A value that is the same for every tyre at rest and goes up as the tyres heat up gave a clue that this might actually be temperature data.
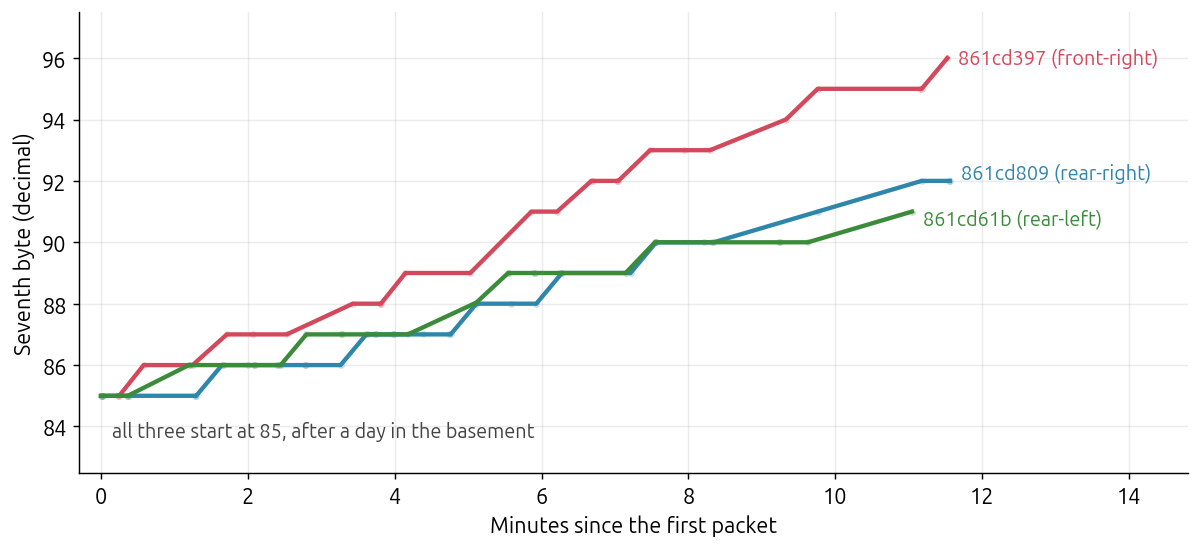 Time vs seventh byte (in decimal) for all three sensors, starting from the same value after a day in the basement
That told me which byte it was, but not how to turn it into °C. For that I needed a moment where I knew the real temperature inside the tyre. I can’t put a thermometer inside a tyre, so I measured the air outside it with a temperature sensor instead, at a moment when both should be the same.
The easiest one is a cold start. When a car has been parked overnight and has not been driven around, we can assume that the air inside the tyres is at the same temperature as the air outside. So the next morning, before driving anywhere, I opened the doors to let the car settle and measured the air temperature with an AHT10, a small temperature and humidity sensor that I had wired to the Raspberry Pi in my car with a few jumper wires. It read 26.2 °C. This is our reference, or ground truth, the value we compare our sensor data with.
You can see the setup in the photo below. The Raspberry Pi sits in the open glovebox, and the AHT10 hangs from it, out in the open air of the cabin.
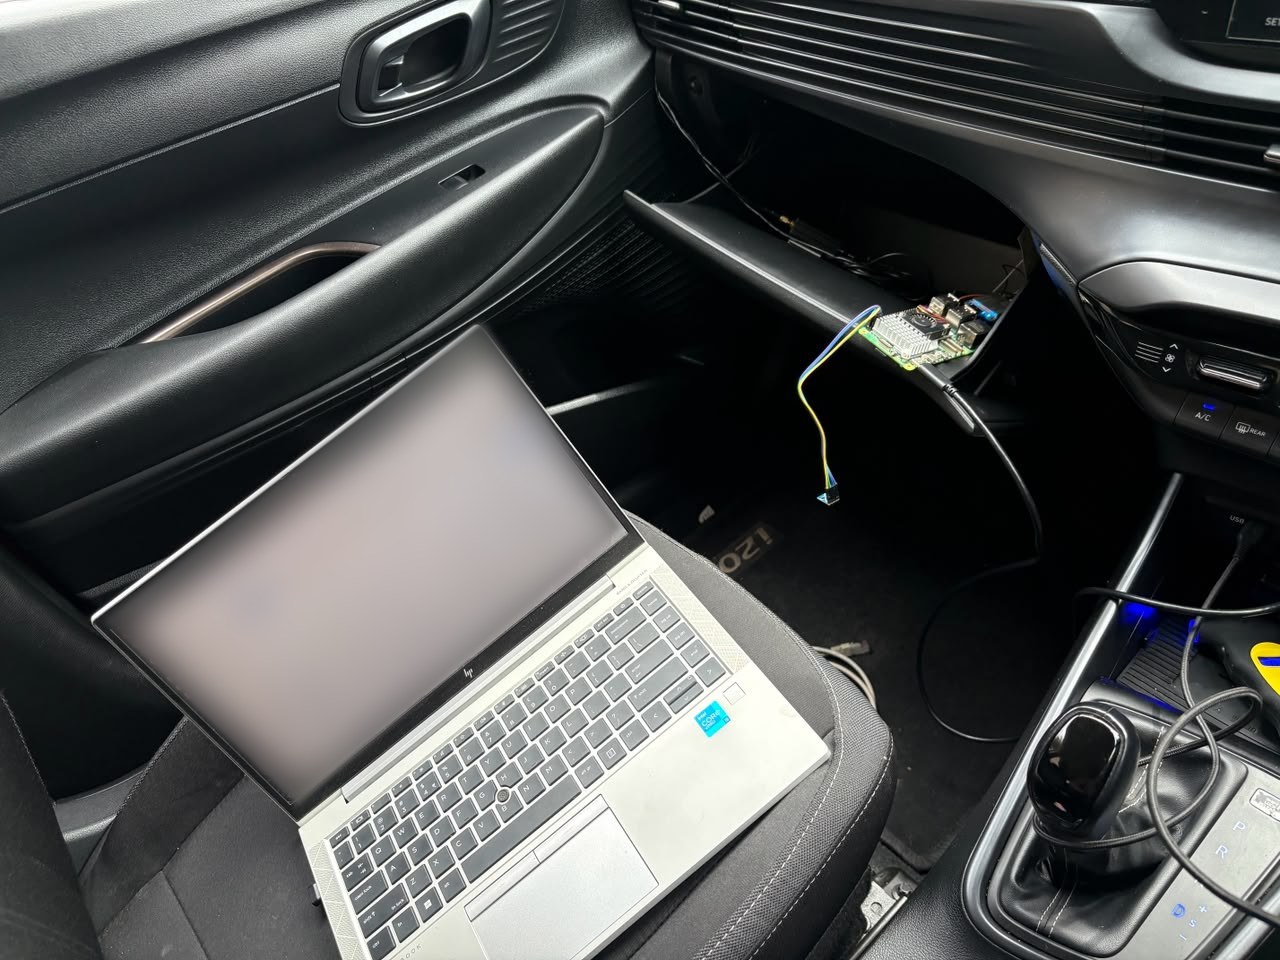 The Raspberry Pi in the glovebox, with the AHT10 temperature sensor on jumper wires
The first packets from my three sensors, right after I started driving, read 81, 82 and 82. I had to start driving because the sensors don’t transmit otherwise, and these first packets were sent before the tyres had any time to heat up on the drive, so the air inside them was still at about 26.2 °C.
So why are these numbers so much bigger than 26.2? Clearly my tyre is not at 81 or 82 °C. A byte can only hold whole numbers from 0 to 255, with no minus sign, but a tyre can easily be below 0 °C in a cold country. To fit negative temperatures into a byte, the sensor adds a fixed number, called an offset, to the temperature before sending it. With an offset of 55, for example, -55 °C is sent as 0, 0 °C is sent as 55 and 26 °C is sent as 81. Manufacturers pick this offset based on the lowest temperature they want the sensor to report. To get the real temperature back, the receiver just subtracts the same offset again.
To find the offset, I took the real temperature away from what each sensor sent. 81 - 26.2 is 54.8, and 82 - 26.2 is 55.8, so all three come out at about 55:
1
temperature (°C) = seventh byte - 55
This is a very common trick in tyre sensors, and many of the decoders in rtl_433 do the same thing with different offsets. The Toyota and BMW decoders subtract 40, the Citroen, Jeep and Hyundai VDO decoders subtract 50, and the GM one subtracts 60. Two of them, for sensors called Jansite Solar and Q85, subtract exactly 55 like mine, which gave me some more confidence in the number.
So for our front-right packet, the seventh byte is 86, and the tyre was at 86 - 55 = 31 °C. With the temperature now decoded, let’s move on.
Finding the pressure
Decoding the pressure was harder. My first try was with the analogue pressure gauge on the tyre compressor from my car’s repair kit (bottom left in the photos below), but it only reads psi values in whole numbers, so I couldn’t get anything accurate out of it. That is when I bought the Stanley digital tyre pressure gauge from the last post (bottom right), which reads in steps of half a psi, with an accuracy of ±0.5 psi.
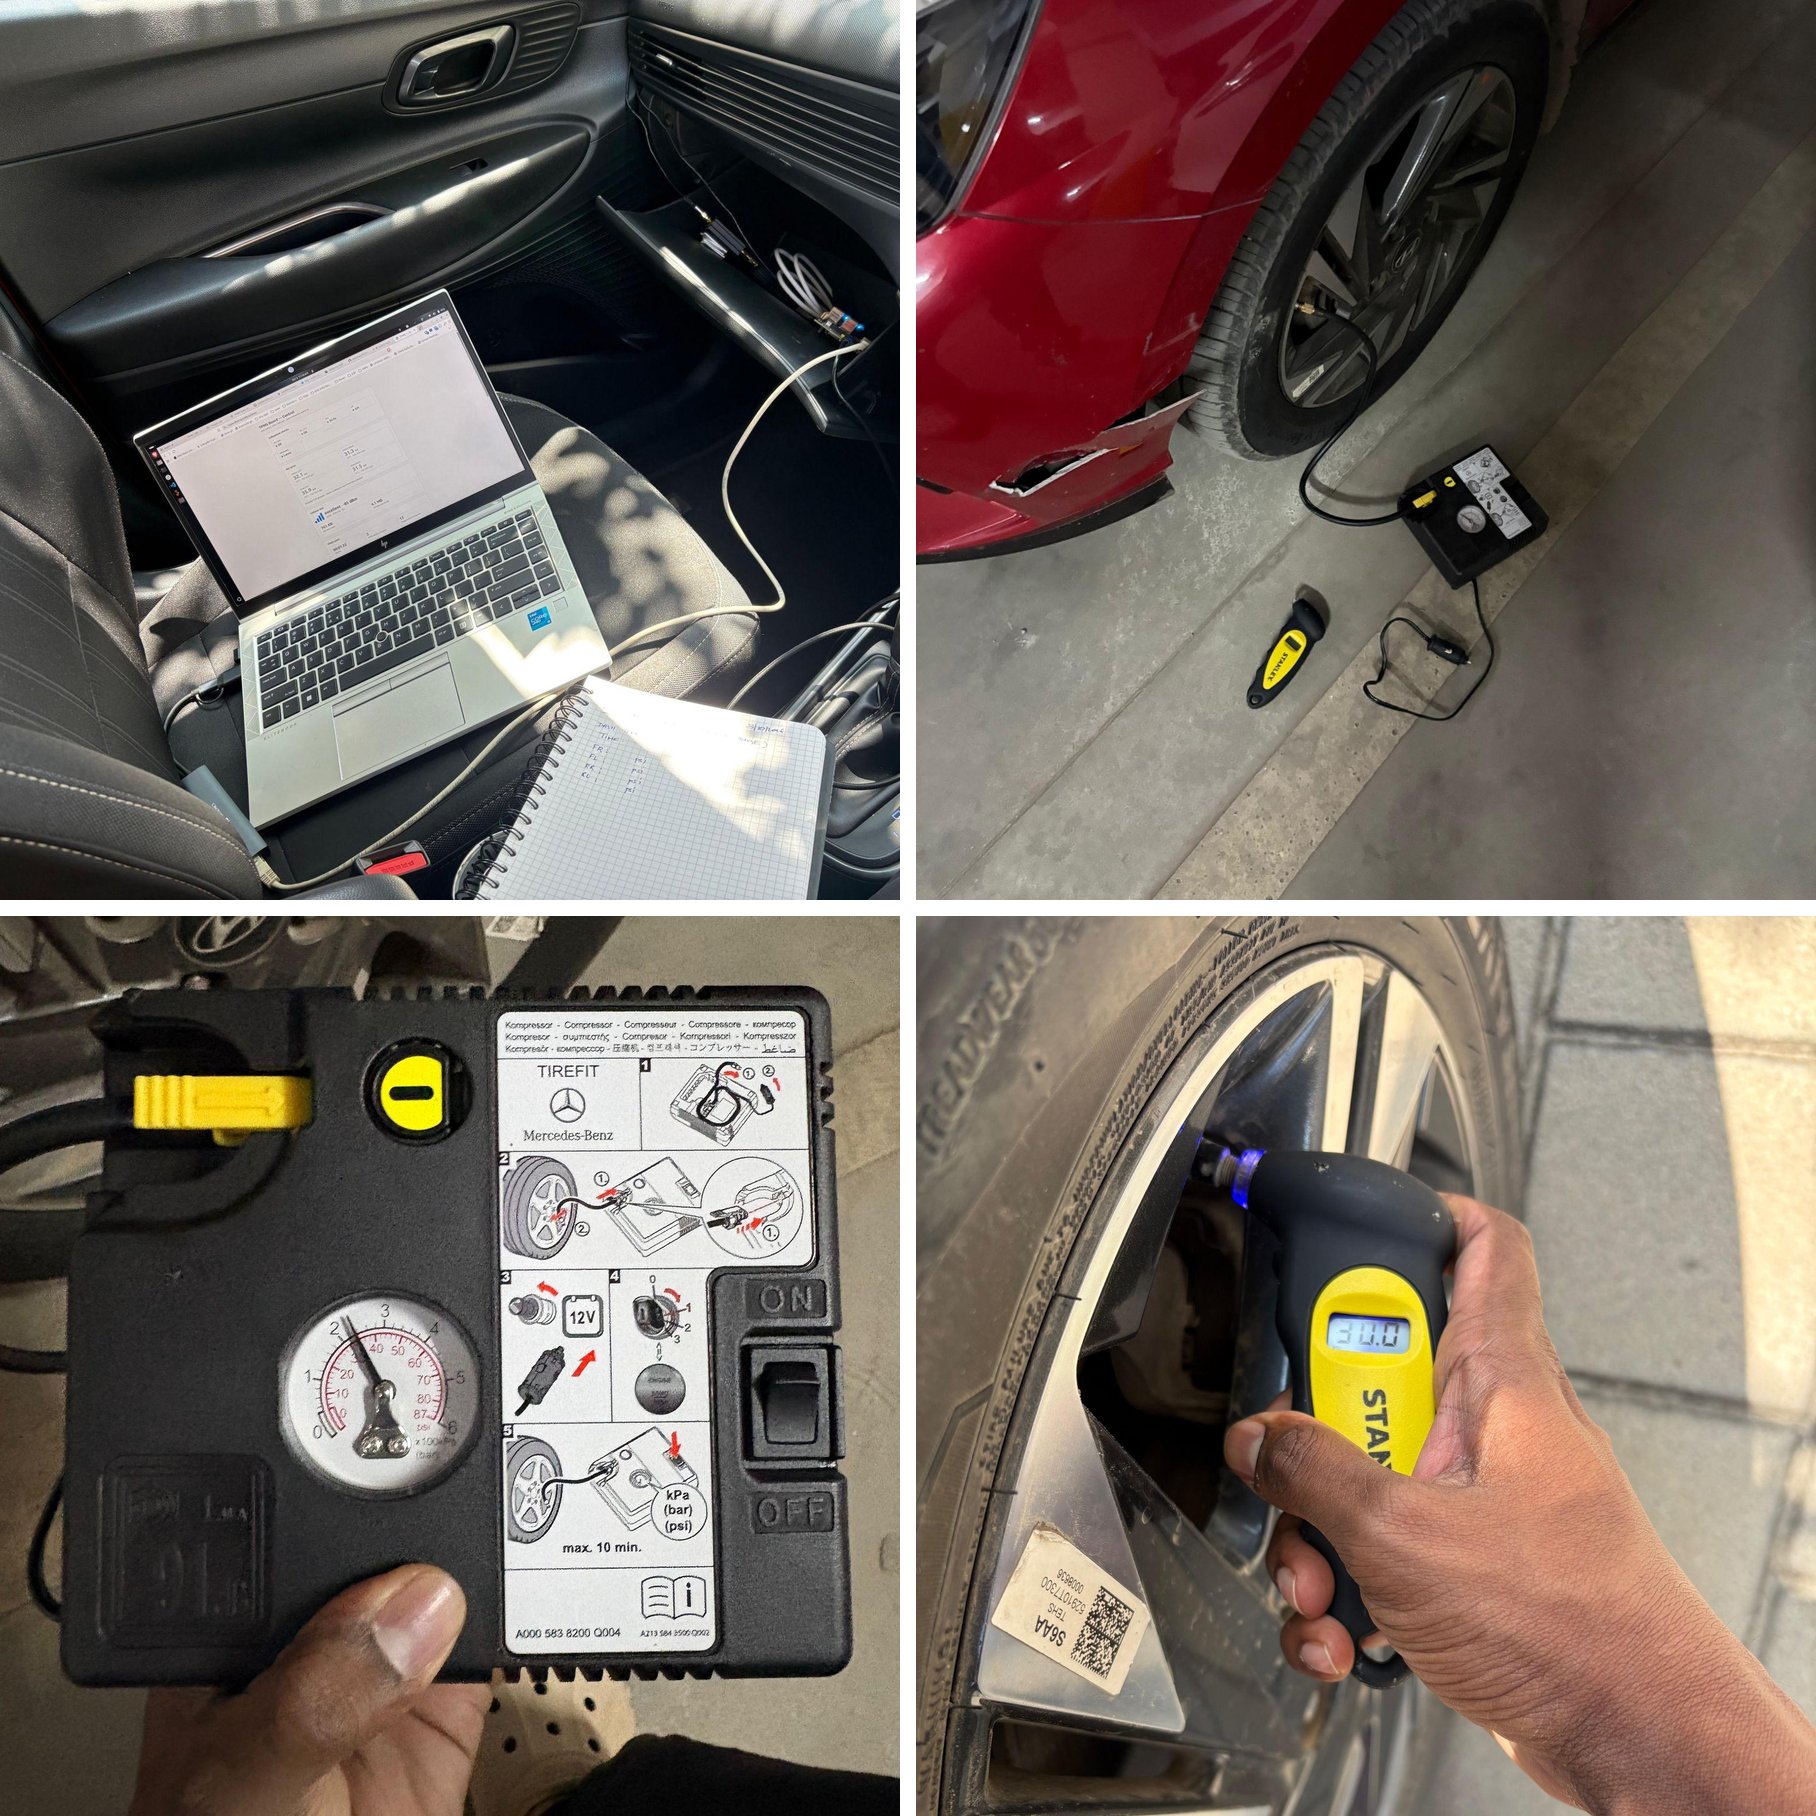 Measuring my tyres. Top: the laptop recording on the passenger seat, and the compressor and digital tyre pressure gauge by the front wheel. Bottom: the analogue gauge on the compressor, and the Stanley digital tyre pressure gauge reading 30 psi
With the digital tyre pressure gauge, I measured my tyres before and after the September evening drive from the last post. The fifth byte rose and fell with the gauge, and together with the first bit of the sixth byte, it makes a 9-bit number, the raw pressure. The << 1 below shifts the fifth byte one place to the left, and the first bit of the sixth byte fills the gap at the end. This is how you would combine them in a language like C:
1
raw pressure = (fifth byte << 1) | (first bit of the sixth byte)
Plotting the raw pressure from the sensors against my gauge readings gave an almost perfect straight line, and the line that fitted best was:
1
pressure (psi) = 0.254 x raw pressure + 0.3
The 0.254 is how many psi each step of the raw pressure is worth, and the 0.3 is a small offset that shifts the whole line up a little. Both numbers were simply chosen to make the line match what my sensor was sending, and both came from my own measurements. I checked this formula on six new gauge readings the next morning and on the new front-left sensor at 43 psi (this tyre was overinflated at the workshop by mistake), and it was always within half a psi.
But two things looked odd. Why 0.254 and not a round 0.25? And with the offset, an empty tyre would read 0.3 psi, which makes no sense.
Two later refills answered both. At a roadside shop, one of my tyres was let down by mistake while refilling until it was completely empty, and the sensor sent a raw pressure of exactly 0, so there should not be an offset like the one I added. And at a fuel station, my car’s dashboard showed exactly the raw pressure times 0.25 for all four tyres. My gauge simply reads about 0.4 psi higher than the sensor, and my first formula had picked that up. So the real formula is:
1
pressure (psi) = raw pressure x 0.25
You can see it in the plot below. All my readings, and the empty tyre, sit on a straight line through 0, with my gauge readings just a little above it.
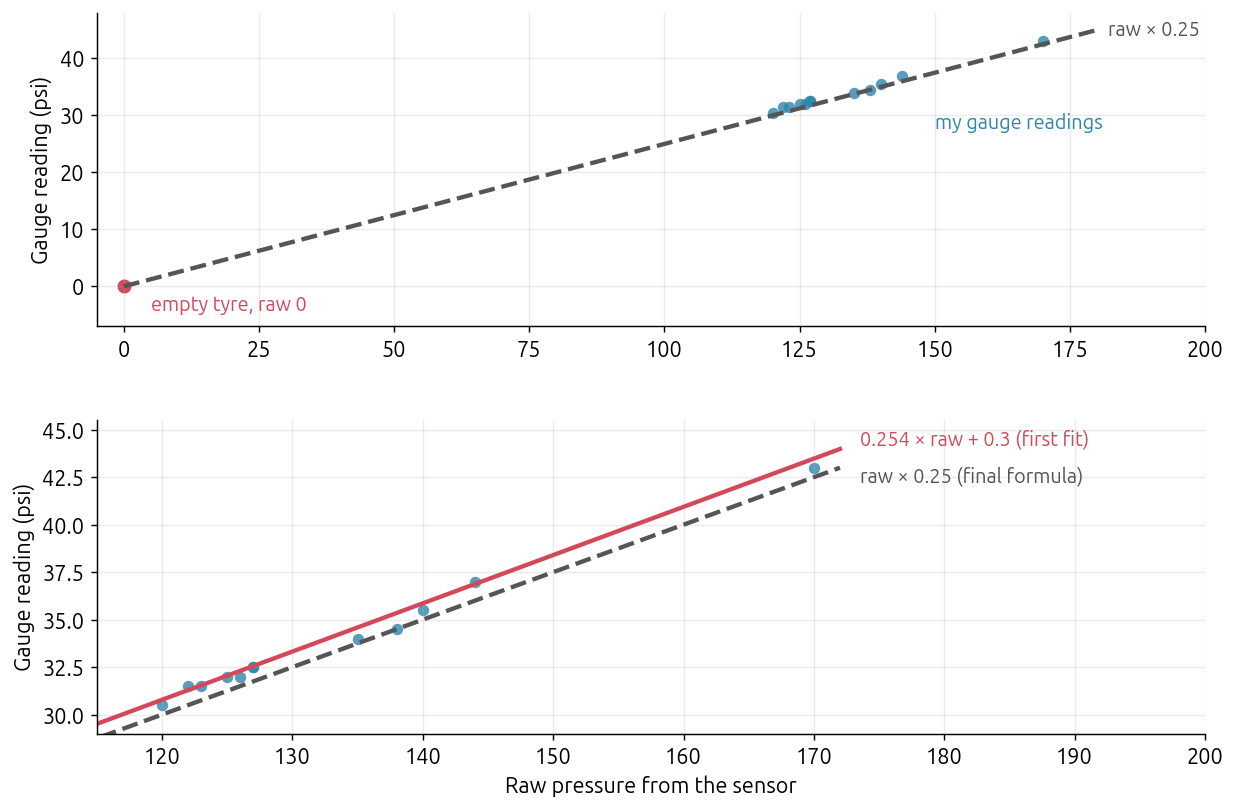 Digital tyre pressure gauge readings against the raw pressure from the sensor. Top: all my readings, including the empty tyre at 0. Bottom: zoomed in, with the first fit and the final formula
For our front-right packet, the fifth byte 3d is 3 x 16 + 13 = 61 (in hex, the letters a to f stand for 10 to 15). The first bit of 01 is 0, so the raw pressure is 61 x 2 + 0 = 122, which is 122 x 0.25 = 30.5 psi.
The mystery byte
That leaves the eighth byte. In most packets it is 1c, but every now and then it is 1d or 0e instead, and it never changes within a burst. It does not follow the pressure or the temperature, and so far none of my experiments have explained it, so for now it stays a mystery. One more value did show up when I let the air out of one of my tyres on purpose, and that is for the next post.
The full packet
Putting it all together, here is everything inside one of my car’s packets, drawn the same way as the Toyota packet in Part 4:
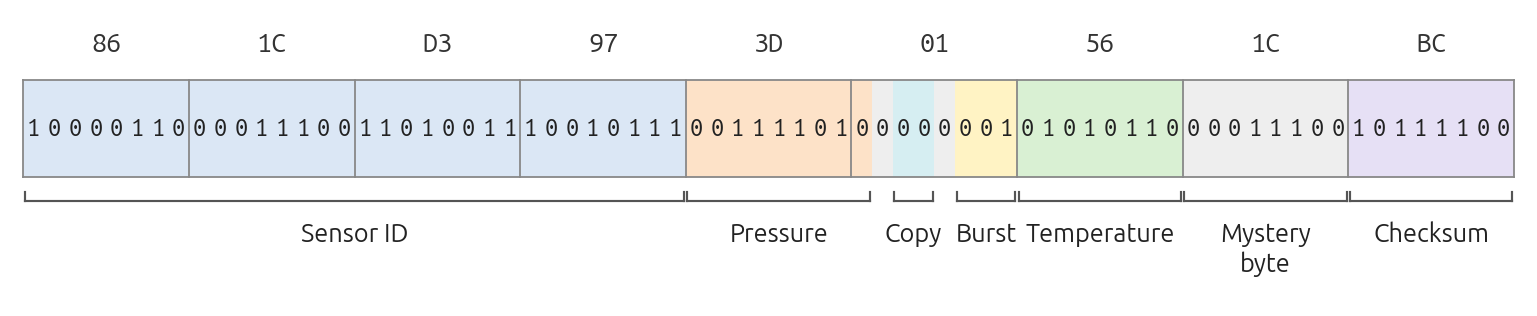 My car’s packet, split into its fields. The two grey bits in the sixth byte were 0 in every packet
Coming up
Coming up in this series:
- The different modes of a sensor, and what happens when I let the air out of my tyre
- Contributing my decoder to rtl_433
- Building a surveillance lab in my glovebox to collect data on every drive
- Why the sensor measures temperature
- Doing all kinds of data analysis on the data collected
Stay tuned.