From experiments to an rtl_433 decoder for my car
Writing a decoder for my Car's sensors and contributing back to rtl_433
Over the last few posts we have performed all sorts of experiments on my car and, in the process, decoded whatever my car was sending in the sensor’s data packets. While doing all of this, I realized that several other cars apart from mine also use the same kind of sensor, as I have seen packets from other cars in my IQ recordings as well. So if we come up with a valid decoder for this sensor, several others can also benefit from it. In this post, we do exactly that. We turn everything we did into a useful contribution back to the rtl_433 repository. Giving back to the open source community has a nice feeling.
Every good work of software starts by scratching a developer’s personal itch.
— Eric S. Raymond, The Cathedral and the Bazaar
A missing decoder
Back in Part 5, when I first ran rtl_433 in my car, my sensors did not show up in the output. I thought they were being reported by the Hyundai VDO decoder, as my car is a Hyundai. When I later looked specifically for my car’s sensors, I realized that they don’t show up at all. I covered how we identified my car’s sensors in an earlier post. But rtl_433 sometimes decoded my sensors as if they were from an Abarth, and the pressure and temperature made no sense. Something was decoding my packets, but it was the wrong decoder.
1
2
3
4
5
time                         model             id        pressure_kpa  temp_c
2026-07-06T05:17:06  Abarth-124Spider  861cd61b  184.92        34.0
2026-07-06T05:17:27  Abarth-124Spider  861cd61b  179.40        34.0
2026-07-06T05:21:34  Abarth-124Spider  861cd61b  176.64        36.0
2026-07-07T12:53:44  Abarth-124Spider  c11c3f27  235.98         0.0
My car is not an Abarth, and as you can see in the output above, the sensor IDs match my car’s. The decoder gets the sensor ID right but not the rest. The pressure jumps around within a few minutes of the same drive, and a tyre at 0 °C in Bangalore makes no sense.
Almost everything decoded
The good news was that by now we had done most of the hard work:
- Part 5: the modulation (FSK), the symbol length (52 µs), Manchester encoding with an inverted polarity, the sensor ID and the additive checksum
- Part 6: the pressure and the temperature, the copy counter and the burst number
- Part 7: the mode byte, which shows the different modes of the sensor
The only thing we did not fully understand was the mode byte. 1c and 01 are clear, 1d and 0e are still guesses.
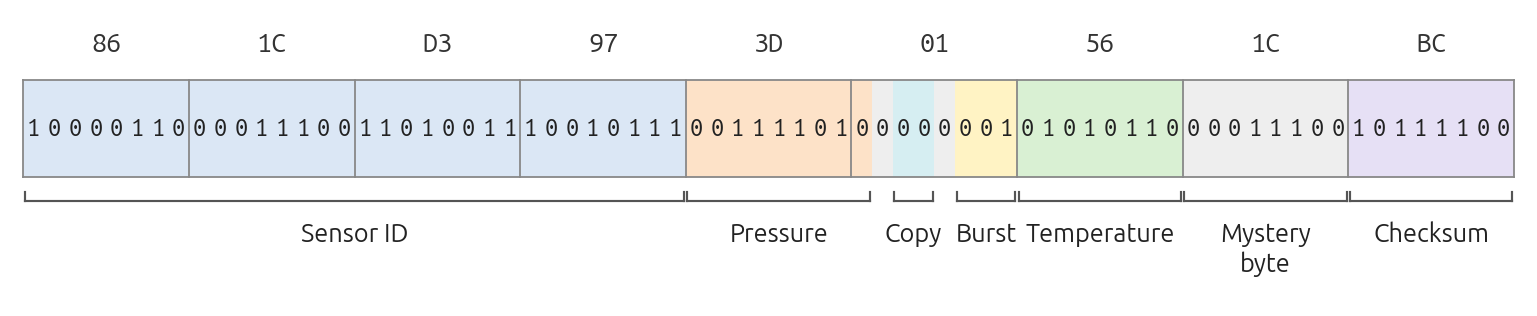 Everything we know about my car’s packet
How to start contributing a decoder
rtl_433 has contribution guidelines that explain what the maintainers want to see and what we as contributors need to work on:
- Test signals first. Before asking for anything, upload recordings of your device to the separate rtl_433_tests repository, so that others can check your files against the available decoders, just like how we have done locally.
- One decoder is one file. A decoder is a single C file in
src/devices/, plus one line to register it. A script in the repo generates the rest.
Looking at a few recently merged pull requests for other tyre sensors gives you an idea of what the reviewers ask for.
Writing the decoder
We start by making a fork of rtl_433 and creating a branch with a new file, src/devices/tpms_schrader_fsk.c. We don’t need to start from scratch though. rtl_433 already has lots of decoders, so we go through them and see which one is close to our sensor. We know our sensor is manufactured by Schrader, so we look for decoder names starting with Schrader:
1
2
3
4
$ ls src/devices | grep -iE 'Schrader|Schraeder'
schraeder.c
tpms_schrader_fsk.c
tpms_schrader_motorcycle.c
Luckily, there were a few decoders with that name. tpms_schrader_fsk.c is our own new file, so that leaves two. schraeder.c holds five older Schrader sensors, but all of them use OOK, not FSK like ours. tpms_schrader_motorcycle.c is for a motorcycle, but it is an FSK sensor in a file of its own, which is exactly what we want to build. That is fine, as we only use it as a template. So I copied that file as my starting template. For the decoding itself, the Toyota TPMS decoder is very close to mine, as we know the modulation (FSK), the symbol length (52 µs) and the 9-byte Manchester packet. So I used it as a reference.
The first thing to change in the template is the block at the bottom that tells rtl_433 what kind of signal our sensor sends. Along with the one line that registers the decoder, which we spoke about earlier, this is how rtl_433 knows about our decoder. These are exactly the numbers we found in Part 5:
1
2
3
4
5
6
7
8
9
r_device const tpms_schrader_fsk = {
        .name        = "Schrader FSK TPMS (Hyundai)",
        .modulation  = FSK_PULSE_PCM, // FSK
        .short_width = 52,            // 52 µs per half-bit
        .long_width  = 52,            // same as short: Manchester
        .reset_limit = 150,           // a 150 µs gap ends the packet
        .decode_fn   = &tpms_schrader_fsk_decode,
        ...
};
From there, it was all about following what was already there in the template and making small changes based on what we already know about the sensor.
It helps to know how rtl_433 hands a packet to a decoder. rtl_433 doesn’t know which decoder belongs to which signal. When it hears a signal, it first demodulates it into a series of pulses. Then, for every decoder of that modulation (FSK for us), it slices those pulses into bits using that decoder’s settings from the block above: 52 µs per bit and a 150 µs gap to end a packet. So the settings don’t pick the decoder. They only decide how the bits are cut for it. A signal with different timings still gets sliced, it just turns into garbage bits. Those bits are then offered to the decoder’s function, one decoder after the other. Each decoder checks them and says “this is mine” or “not mine”. That is also why the Abarth decoder fired on my packets: its checks were too loose for my sensor. So our checks need to be strict.
After each step, we can run the decoder on any of the recordings and use rtl_433’s debug output to print the bits at that point, to make sure they were what I expected before moving on:
- Make sure rtl_433 hands my recording to the new decoder
- Find the start of the packet after the preamble. We have already seen what a preamble is in previous posts
- Undo the Manchester encoding (with my sensor’s inverted polarity)
- Check the checksum
- Pull out the fields and print them
For example, for the first step, the decoder does nothing except print the bits it receives:
1
2
decoder_log_bitrow(decoder, 2, __func__,
        bitbuffer->bb[0], bitbuffer->bits_per_row[0], "raw row0");
The 2 is the debug level. This line only prints when the decoder runs with enough verbosity. We run rtl_433 on a recording like this:
1
$ rtl_433 -r g001_433.92M_1000k.cu8 -R 387:vv
-rreads a recording instead of a live radio-R 387enables only our decoder. Every decoder in rtl_433 has a number, which is simply its position in the list of registered decoders. Ours was added at the end of that list, as number 387.rtl_433 -R helplists them all:vvturns on the debug output for just this decoder
And we get the raw bits of the packet:
1
codes     : {177}555555569656956a6a6555996665556a669556a569660
The 5555... at the start is the preamble, and 9656 is the Manchester encoding of 91, the first byte of my sensor’s ID. So we know the bits are reaching our decoder. The same trick works for every step after this one.
Steps 3 and 4 are just a few lines. rtl_433 already has a Manchester decoder, but its polarity is the opposite of my sensor’s, so we invert the result:
1
2
3
4
5
6
7
bitbuffer_manchester_decode(bitbuffer, row, payload_pos, &decoded, 72);
bitbuffer_invert(&decoded); // my sensor uses the opposite polarity

uint8_t *b       = decoded.bb[0];
uint8_t checksum = add_bytes(b, 8) & 0xff;
if (checksum != b[8])
    return DECODE_FAIL_MIC; // not my packet
And step 5 pulls out the fields, using the formulas from Part 6:
1
2
3
4
unsigned pressure_raw = (b[4] << 1) | (b[5] >> 7);
double pressure_psi   = pressure_raw * 0.25;
int temperature_c     = b[6] - 55;
unsigned mode         = b[7];
The end result is around 170 lines of C, mostly following the template, including a long comment at the top that describes the protocol. One decoder covers both sensor models in my car, the old AFFPA4 and the newly replaced BG6FD4 from Part 2. This is what it prints for one of my packets when we run the rtl_433 tool:
1
2
3
4
5
$ rtl_433 -r g001_433.92M_1000k.cu8 -R 387
time      : @0.021427s
model     : Schrader-FSK type      : TPMS          id        : 9187740a
Pressure  : 42.00 PSI    Temperature: 33 C         Burst repeat: 0
Sequence  : 7            Mode      : 1c            Integrity : CHECKSUM
This looks nice, right? We can see all the familiar data from the packet here in a nicely organized way. Success!
We are not completely sure about the mode, so for now it only prints the raw value.
The test cases
Next, the test signals. The maintainers of rtl_433 also maintain a separate repo for holding all the test files for the sensors in the main repo. These are used to validate newly submitted decoders before they are merged. The rtl_433_tests repository is a big collection of recordings from all kinds of devices. Each recording comes with a .json file of what rtl_433 should decode from it. This way, if someone changes rtl_433 later and breaks a decoder, the tests catch it.
I added a folder for my sensor here, tests/Schrader_FSK_Hyundai, with seven IQ recordings from my car:
| File | Sensor | What it shows |
|---|---|---|
| g001 | BG6FD4 | A normal burst of 4 packets while driving |
| g002 | BG6FD4 | Emergency packets from letting the air out |
| g003 | AFFPA4 | A normal burst, to show one decoder handles both models |
| g004 | AFFPA4 | Emergency packets, tyre being deflated (30 psi) |
| g005 | AFFPA4 | Emergency packets, tyre being emptied (12.5 psi) |
| g006 | AFFPA4 | Emergency packets, empty tyre (0 psi) |
| g007 | AFFPA4 | Emergency packets, tyre being refilled (19.25 psi) |
g004 to g007 come from our lucky day with the leak and the workshop recordings in Part 7. Along with the recordings, I also added a README describing the protocol, photos of the labels of both sensor models and links to their FCC filings. All of this follows whatever was submitted before us, just like how we used a different sensor as a template.
1
2
3
4
5
6
7
8
9
10
$ ls tests/Schrader_FSK_Hyundai
README.md
g001_433.92M_1000k.cu8   g001_433.92M_1000k.json
g002_433.92M_1000k.cu8   g002_433.92M_1000k.json
g003_433.92M_1000k.cu8   g003_433.92M_1000k.json
g004_433.92M_250k.cu8    g004_433.92M_250k.json
g005_433.92M_250k.cu8    g005_433.92M_250k.json
g006_433.92M_250k.cu8    g006_433.92M_250k.json
g007_433.92M_250k.cu8    g007_433.92M_250k.json
sensor_new_BG6FD4.jpg    sensor_old_AFFPA4.jpg
The file names follow the repo’s convention: the frequency (433.92 MHz) and the sample rate of the recording (1000k or 250k samples per second).
This is the .json file of my first recording, g001. It has one line per packet, for the burst of 4 packets:
1
2
3
4
{"time" : "@0.021427s", "id" : "9187740a", "pressure_PSI" : 42.000, "temperature_C" : 33.000, "burst_repeat" : 0, "mode" : 28, ...}
{"time" : "@0.131530s", "id" : "9187740a", "pressure_PSI" : 42.000, "temperature_C" : 33.000, "burst_repeat" : 1, "mode" : 28, ...}
{"time" : "@0.322004s", "id" : "9187740a", "pressure_PSI" : 42.000, "temperature_C" : 33.000, "burst_repeat" : 2, "mode" : 28, ...}
{"time" : "@0.482127s", "id" : "9187740a", "pressure_PSI" : 42.000, "temperature_C" : 33.000, "burst_repeat" : 3, "mode" : 28, ...}
So where do these .json files come from? We don’t write them by hand. We simply run our new decoder on each recording and save what it prints as JSON:
1
$ rtl_433 -R 387 -r g001_433.92M_1000k.cu8 -F json > g001_433.92M_1000k.json
-F json prints every decoded packet as one line of JSON, and -R 387 makes sure only our decoder runs, so no other decoder sneaks its lines into the file. We do this once for each of the seven recordings.
Testing the decoder
How do I know the decoder is right? I checked it in a few different ways:
- Against the checksum. All 414 packets passed the checksum, from both sensor models.
- Against the dashboard. The car’s dashboard rounds the pressure down to a whole psi number. On two different days, with cold and hot tyres, the decoder’s pressure rounded down matched the dashboard in every case.
- Against my digital tyre pressure gauge. As we saw in Part 6, the decoded pressure follows the gauge closely. The gauge simply reads about 0.4 psi higher, and the gauge’s website says its accuracy is about ±0.5 psi, so that is safe for us.
- Against the test signals. All seven recordings in the tests folder decode with the new decoder, and the output matches the
.jsonfiles.
With the tests done, all that is left is to raise a pull request to submit it.
Sending it upstream
I opened two pull requests: #3707 with the decoder for rtl_433, and #526 with the test signals for rtl_433_tests. Each one links to the other.
One of the maintainers asked for the decoder to output the pressure in psi (pressure_PSI), since that is what the sensor measures. I updated the decoder and the .json files of the test signals the same day. Around the same time, I added the emergency mode recordings and the final pressure formula from the experiments in Part 6 and Part 7.
| Pull request | Status |
|---|---|
| rtl_433 #3707 |  |
| rtl_433_tests #526 |  |
The status above is live, straight from GitHub. As of writing this post, both pull requests are still open and waiting for a final review. I’ll update this post when they are merged.
Coming up
Coming up in this series:
- Building a surveillance lab in my glovebox to collect data on every drive
- Why the sensor measures temperature
- Doing all kinds of data analysis on the data collected
Stay tuned.
Further reading
If you want to dig deeper into some of the ideas in this post, these are the documents I found most helpful:
- Contributing to rtl_433, the guide on how to add a decoder and test signals
- The Toyota TPMS decoder, the decoder I used as a reference for mine